Call Lists consist of persons and entities to contact in the event of alarms.
Call Lists are not required for any account or entity if the contacts to be called are in the order desired on the Contact List.
Call Lists have two types: Main and Sub lists.
- Main Lists contain people and entities that may be contacted in the event of an alarm.
- Sub Lists contain ONLY people.
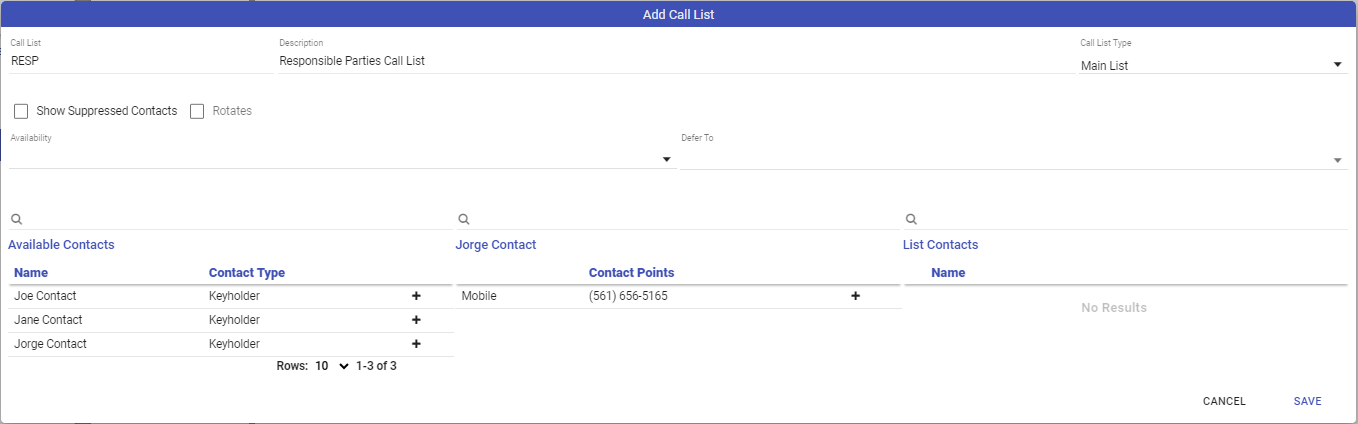
Creating a Main Call List
- Click the Plus Sign (➕) to the right of Main Lists.
- Enter the Call List ID - Common Call List titles are: DFLT (Default), RESP (Responsible Parties), CL1 for Call List 1, and so on.
- Enter the Call List Description - Common Descriptions define who and why this list exists. For example, Default Call List, Responsible Parties Call List, Fire Contacts, Medical Contacts, etc.
- The Call List Type automatically loads based on where you clicked the plus sign. If you selected the wrong type, you may drop this down and select the correct type.
- The available contacts display in the lower section of the dialog.
- Click the plus sign (➕) next to the individual or entity to move the contact and all their contact points to the Call List.
- Click the contact then the plus sign next to the Contact Point to move the individual number to the call list.
- If the order required readjustment, up (↑) and down (↓) arrows to place the list.
- Once all items are entered for the new call list as required, click Save.

Creating a Sub Call List
- Click the Plus Sign (➕) to the right of Sub Lists.
- Enter the Call List ID - Common Call List titles are DFLT (Default), RESP (Responsible Parties), CL1 for Call List 1, and so on.
- Enter the Call List Description - Common Descriptions define who and why this list exists. For example, Default Call List, Responsible Parties Call List, Fire Contacts, Medical Contacts, etc.
- The Call List Type automatically loads based on where you clicked the plus sign. If you selected the wrong type, you may drop this down and select the correct type.
- The available contacts are displayed in the lower section of the dialog.
- Click the plus sign (➕) next to the individual to move the contact and all their contact points to the Call List.
- Click the contact then the plus sign next to the contact point to move the individual number to the call list.
- If the order requires readjustment, click the up (↑) and down (↓) arrows to place the list.
- Once all items are entered for the new call list as required, click Save.
Call List Availability
Call Lists can be made available for specific periods of time. An example of this is when a specific group of people are contacted during business hours and a different group outside of business hours. Call List Availability requires a General Schedule of the same type. When you have a Call List General Schedule in place, it is possible to make the call list selected available from the list.
Please note that the Final Defer to Call List may not have a General Schedule to prevent an infinite loop. We recommend if you are using Call List availability the addition of a DFLT call list to use when all else fails.