The Alarm Queue allows an Operator to view and access alarms presented to the Manitou system. Alarms within the queue are ordered with the by priority and oldest alarm at the top. The Alarm Queue color codes based on the Manitou Options settings for the organization.
Display Style
The Alarm Queue orders the alarms by the oldest and highest priority events within the list. There are three options here: Detailed, Summary by Master Customer, and Summary by Customer ID.
- Detailed - Displays a line for each alarm in the queue.
- Summary by Master Customer - groups the alarms to the highest priority, oldest alarm collapsed by the Master Customer. This includes any customers that are Main and Sub accounts or Master and Related to Master. These roll up underneath the Master customer ID but can be for differing customer records.
- Summary by Customer ID - groups the alarms to the highest priority, oldest alarm, collapsed by the Customer ID. This is often the most desired for high volume operations to keep a clean and concise alarm queue.
Color Coding
The Alarm Queue color codes based on the selection made within the Manitou Options form. There are two color coding options: Age-based (default) or Alarm Color.
- Age-Based (Default) colors the alarm queue by the color settings set in the Supervisor Workstation options.
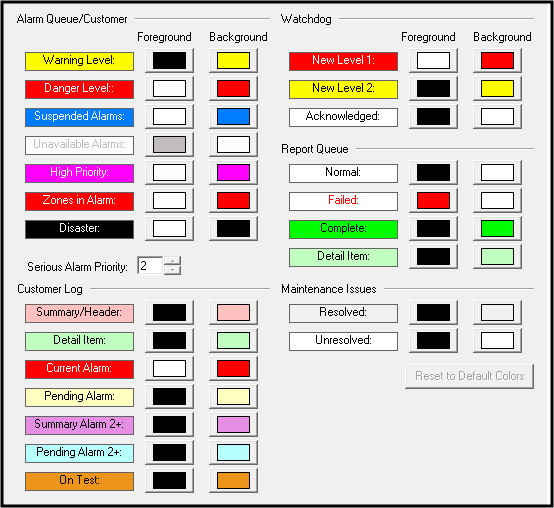
- Event Based colors the alarm queue based on the alarm colors assigned to the events. This is used often to help clearly identify what types of alarms are in the queue.


Alarm Aging
As alarms age within the Alarm Queue, the alarms or indicators change colors based on the aging colors set. 
Alarms age at different rates based on their settings within the individual events. 
- Yellow (default) - the alarm aged to the Warning level
- Red (default) - the alarm aged to the Danger level and needs immediate attention
Columns, Sorting, and Filters
Operators may adjust items in the alarm queue based on their preference.
Users may hide or enable columns as required. Certain columns are fixed, meaning that when no other optional column is selected these will still be present, while others can be added or removed from view.
Fixed Columns
- Time - Posted date and time the alarm hit the queue
- Priority - Number coordinating to the level or importance of the alarm; numbers range from 1-100, with 1 being of highest priority
- Customer - Customer name
- Event - Description of alarm
- Availability - Shows whether or not an alarm is available for an Operator to handle
- Status - Suspended, New, Deferred, or Actioned
- Suspend Time - Date and time when the alarm was suspended
Optional Columns
These columns can be added to or removed from the Alarm Queue list by simply right-clicking in the column list and selecting or de-selecting (checked or unchecked).
- Alarm No - Combination of the account's unique identifier within the system and alarm sequence number as it came into the queue that can be provided to authorities upon request
- Action ID - Action Pattern tied to the alarm
- RLP - Receiver Line Prefix assigned to account/signal; clearly separates and defines accounts
- TXID - Transmitter ID; account no. of dialer/radio/GSM sending in signal
- Code - Manitou Event code associated with alarm
- Event Category - Assigned category; allows for management for Monitoring Groups and Disaster Mode
- P/F/M - Police/Fire/Medical; Yes or No depending on whether P/F/M has been contacted
- Last Activity Time - Last time an action was taken on the alarm
- Post Code - Postal/Zip Code on customer record
- Customer ID - Customer account number
- User - Operator that last handled alarm
- Area - Area presented with alarm
- Zone - Zone presented with alarm
- Point ID - Zone, or Point ID, description defining alarm location or detail
- Language - Language tied to customer account
- More Act - Yes or No, if additional activity on the event exists
Sorting
Operators may sort the alarm queue columns as needed within the Alarm Queue. Sorting is either ascending (A-Z, 1-10, or chronological order) or descending (Z-A, 10-1, or reverse chronological order) order depending on the direction of the arrow that displays when you click on a Column Header.
The Alarm Queue stays sorted by selection even when navigating away from the page. To revert back to the default sorting order, click once on the Priority column.
Column order can also be adjusted by selecting dragging and dropping individual columns. To move a column, click and hold on the Column Name and drag it to the preferred location.
Filtering the Alarm Queue
Operators may use the quick search field above the alarm queue to filter for a specific customer or event type. 
For more specific searching click the funnel icon. 
 The Filter dialogue loads where users can filter by a plethora of options. When done, click DONE.
Filtered Results
When filtered, the Alarm Queue displays a Red header reading the Queue is Filtered.
To remove the filter, click the cancel symbol. 