All configured zones display under Zones as available for the plan layers.
Adding a Zone to a Plan Layer
- With the layer selected, expand the Zones section and select the zone to add.
- Click and Drag the zone to the location the icon should sit on the Plan.
- Release the zone on to the plan.
- The default of a zone detector shows on the zone in the default color. To make changes, right click the zone and choose change Icon.
- Select the Icon and any available color.
- Click Done.
- Repeat as required.
- Save (💾) the Record.
Editing a Zone Layer
- Right-click the Zone and select the desired option.
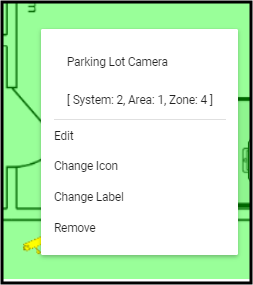
- Edit - Allows the movement of the zone on the plan.
- Change Style - Allows the adjustment of the color and icon applied to the zone.
- Change Label - Allows updating the description of the zone, which populates from the Zone list for the System, Area, and Zone selected.
- Remove - Deletes the zone from the plan and may be used in another location.
- Save (💾) the Record.
