Manitou Options set the software operational standards for the monitoring site. Prior to setting permissions, be sure your Standard Operating Procedures (SOPs) are up to date and you are prepared to answer business practice questions relating to your alarm operations.
Within each option there is a "Further Information" button that further describes the option and when appropriate, what the values mean. 
The following links take you to the individual Options groups:
- Account Creation/Maintenance Options
- Accounting Options - See Below 👇🏼
- Alarm Handling Options
- Alarm Tracking Options
- Color Options - See Below 👇🏼
- Contact Point Device Defaults Options
- Country/Locale - See Below 👇🏼
- General Options
- Location/GPS Options - See Below 👇🏼
- Output Details Options
- Password Options
- Purge Options
- Reports Options
- Response Options- See Below 👇🏼
- Signal Processing Options
- System Options
- Version/Revision Details - See Below 👇🏼
- Voice Recordings Options- See Below 👇🏼
- Watchdog Options- See Below 👇🏼
Accounting Options
Accounting Options are used when integrated with an Accounting System such as SedonaOffice.
- Accounting company ID required - Selecting Yes sets this option to require an Accounting Company ID for each Customer.
- Display accounting status - When selecting Yes to this option Manitou displays the customer's accounting status data on the Alarm form and the Customer Record.
- Don't worry, it doesn't share how much the customer pays or is in arrears. Nor does it force operators to become collection agents. This simply shows if they are active and recurring or on any accounting holds.
Color Options
Upon arrival into the Options form in Manitou, the Color Options display.
Use this form to customize the color coding that is displayed in SWS. Select a foreground and background color. When you finish modifying the color palette, click "Save".
Further details related to the different color selections:
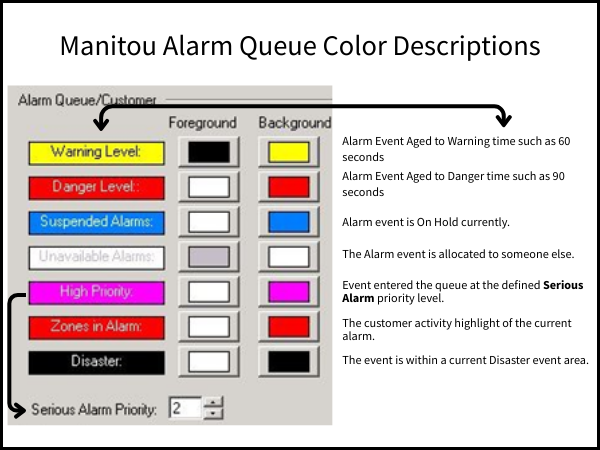
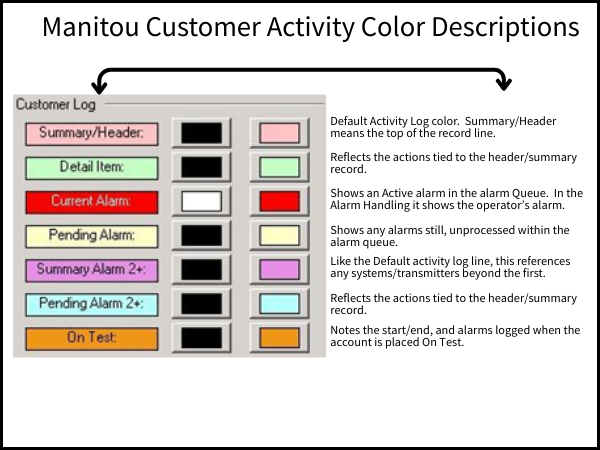
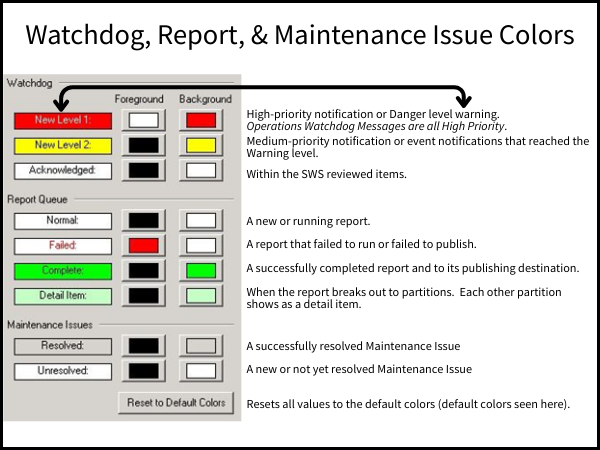
Be careful! Keep the colors viewable for color-blind persons.
Country/Locale Option
This information populates directly from the Monitoring Company record within the Operator Workstation.
When updated within the Monitoring Company record, the values update here.
Location/GPS Options
- Location Services Key - Enter the license key for Location Services here.
- Mapping Types - This option defines the type of mapping software Manitou uses for Location Services. Your choices are: "MAPPOINT", "BOLDTRAK", "BING", and "GOOGLE". This setting does not apply to Disaster Mode setup in the Operator Workstation.
Response Options
These options relate to the Signal Customer Attribute of E. These determine the length of time between each item based on the Event category.
- Fast Fire - This option defines the maximum number of seconds an Operator has to respond to a fire emergency that requires an immediate Authority response.
- Fast Other - This option defines the maximum number of seconds an Operator has to respond to a non-fire, non-panic/social emergency that requires an immediate Authority response.
- Fast Panic/Social - This option defines the maximum number of seconds an Operator has to respond to a panic/social emergency that requires an immediate Authority response.
- Medium Fire - This option defines the maximum number of seconds an Operator has to respond to a fire emergency that does not require an immediate Authority response.
- Medium Other - This option defines the maximum number of seconds an Operator has to respond to a non-fire, non-panic/social emergency that does not require an immediate Authority response.
- Medium Panic/Social - This option defines the maximum number of seconds an Operator has to respond to a panic/social emergency that does not require an immediate Authority response.
Version/Revision Options
- Client Revision (Dealer) - This is a read-only field that displays the minimum Manitou Dealer client revision number allowed to run on the system. This is updated by Manitou Support personnel upon each upgrade to help ensure old clients are not attempting to run against new Application servers.
- Client Revision (Operator) - This is a read-only field that displays the minimum Manitou client revision number allowed to run on the system. This is updated by Manitou Support personnel upon each upgrade to help ensure old clients are not attempting to run against new Application servers.
- Client Revision (Supervisor) - This is a read-only field that displays the minimum Manitou Supervisor Workstation client revision number allowed to run on the system. This is updated by Manitou Support personnel upon each upgrade to help ensure old clients are not attempting to run against new Application servers.
- Version of the database - This is a read-only field and displays the current version of the Manitou system. This cannot be edited from the user interface. Each new release contains an update to the version on the database.
Voice Recording Options
These options are used to configure the interface to a voice recording system.
Watchdog Options
- Number of months of Watchdog logs to keep - This option defines the number of months before the system purges Watchdog logs. If the Supervisor Workstation is open, Watchdog messages do not go to the Client Workstation. They will only be displayed in the Supervisor Workstation.