Alarm Handling
Alarm Handling is the primary reason for Manitou to exist. Yes, it is also used to run reports and provide other services, but as an Alarm Automation software, the primary function is for operators to handle alarms.
Before we begin, it is important to understand some things.
In Manitou, there are Alarms and there are Signals. The difference between an Alarm and a Signal is that an Alarm may have come to the screen for an operator to handle, whereas a Signal is simply logged to the Customer Activity. Burg Alarms and Fire Alarms are a good example of an Alarm, since they typically need some actions to be done by an operator. Examples of signals would be Transmitter Test signals, or Burg Restore signals (since these require no actions by the operator, they are simply logged to the Customer Activity.
Alarms, because of everything that was just explained, are the events that Operators interact with.
The Alarm Queue
 The Alarm Queue
The Alarm Queue is a list of Alarms that have not yet been closed. To navigate to the Alarm Queue, click the Menu Icon > Operations > Alarm Queue, or simply click on the shortcut icon.
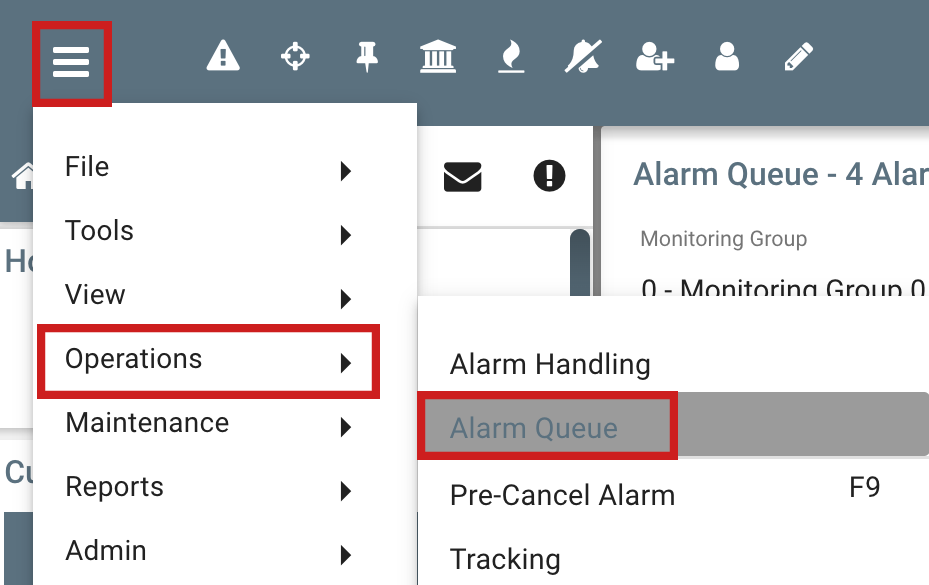 Menu Icon > Operations > Alarm Queue
 Alarm Queue shortcut next to menu icon
At any given time, the Alarm Queue may list new alarms, alarms that are suspended, alarms that were recently suspended, and alarms that may be handled by another user.
The Alarm Queue is automatically organized by Priority, then by Age. This double sort means that the default view of the Alarm Queue always shows the highest priority alarms at the top. If there are multiple alarms with the same priority, the oldest alarm will be at the top of the priority group.
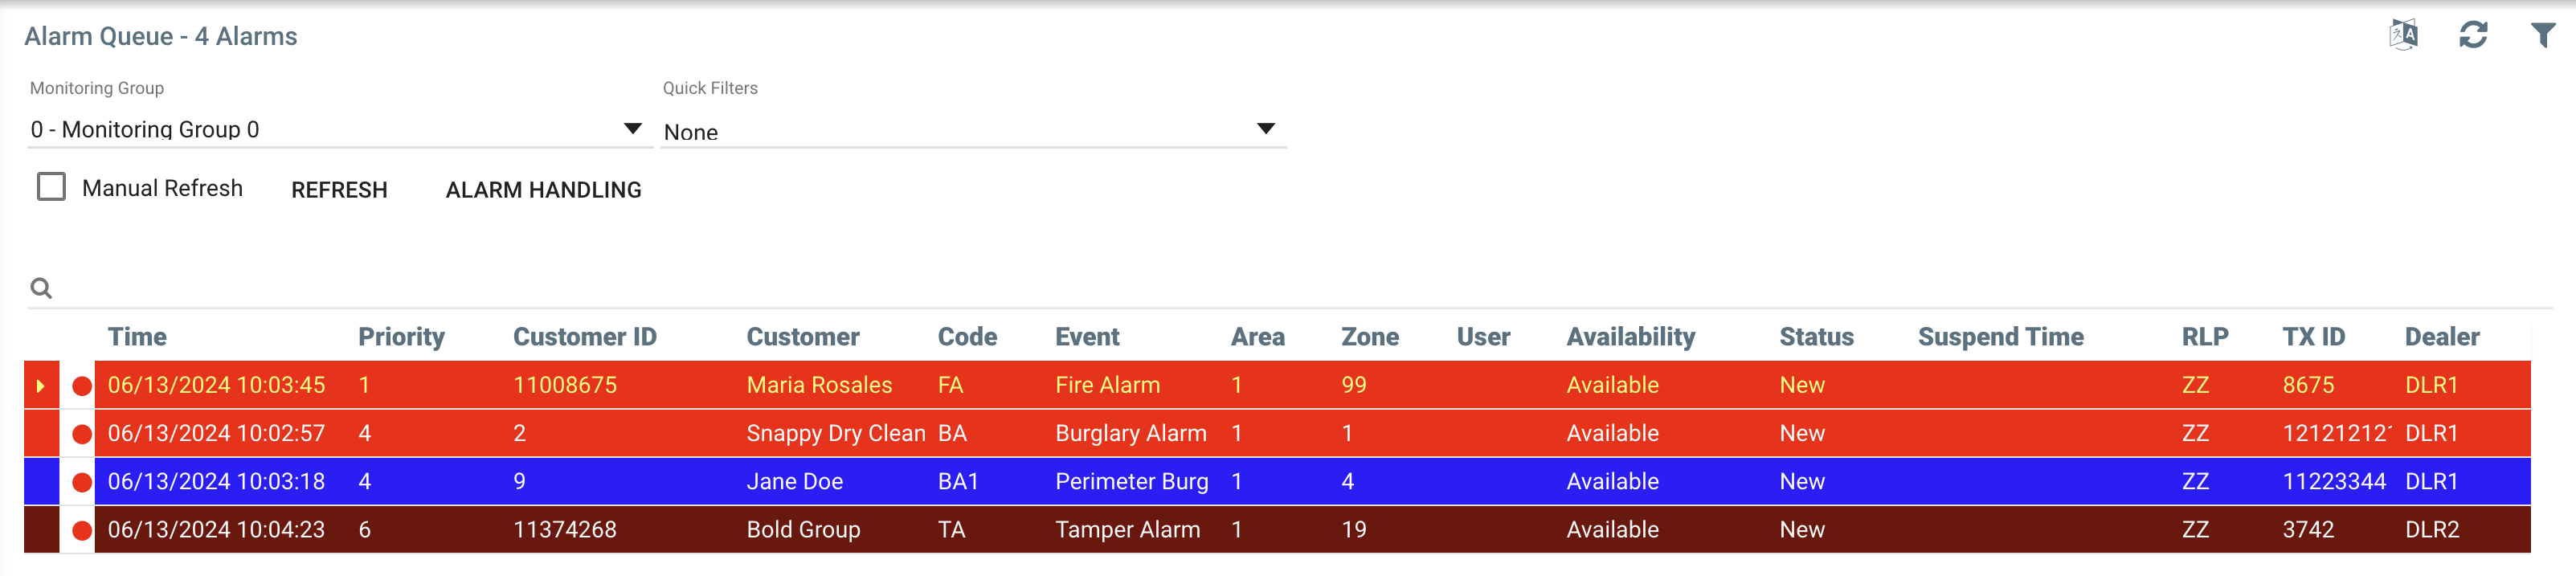 Alarm Queue Sorted by Priority
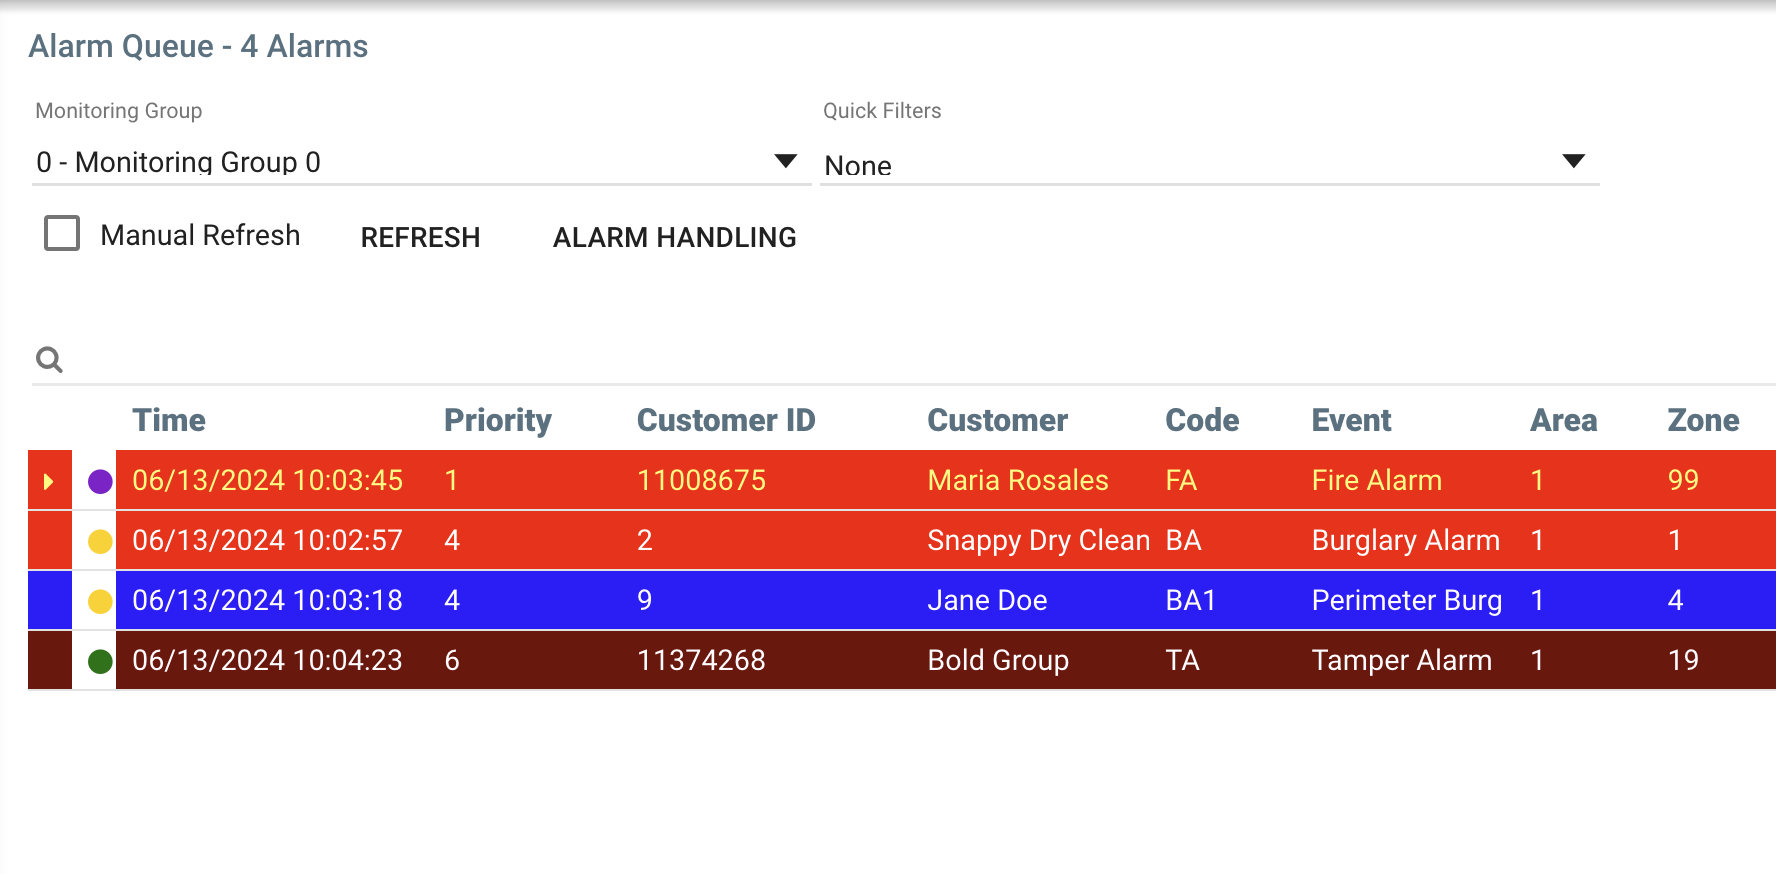
There are two color schemes possible within the Alarm Queue, but your Monitoring Center will only be using one. If the color of the Alarm lines changes over time, the Alarm Queue is most likely set to display the colors based on the age of the Alarm. If the colors of the Alarm lines don’t change, and if there is a small dot on the left edge of the Alarm Queue, then the setting is most likely to display colors based on the Alarm itself.
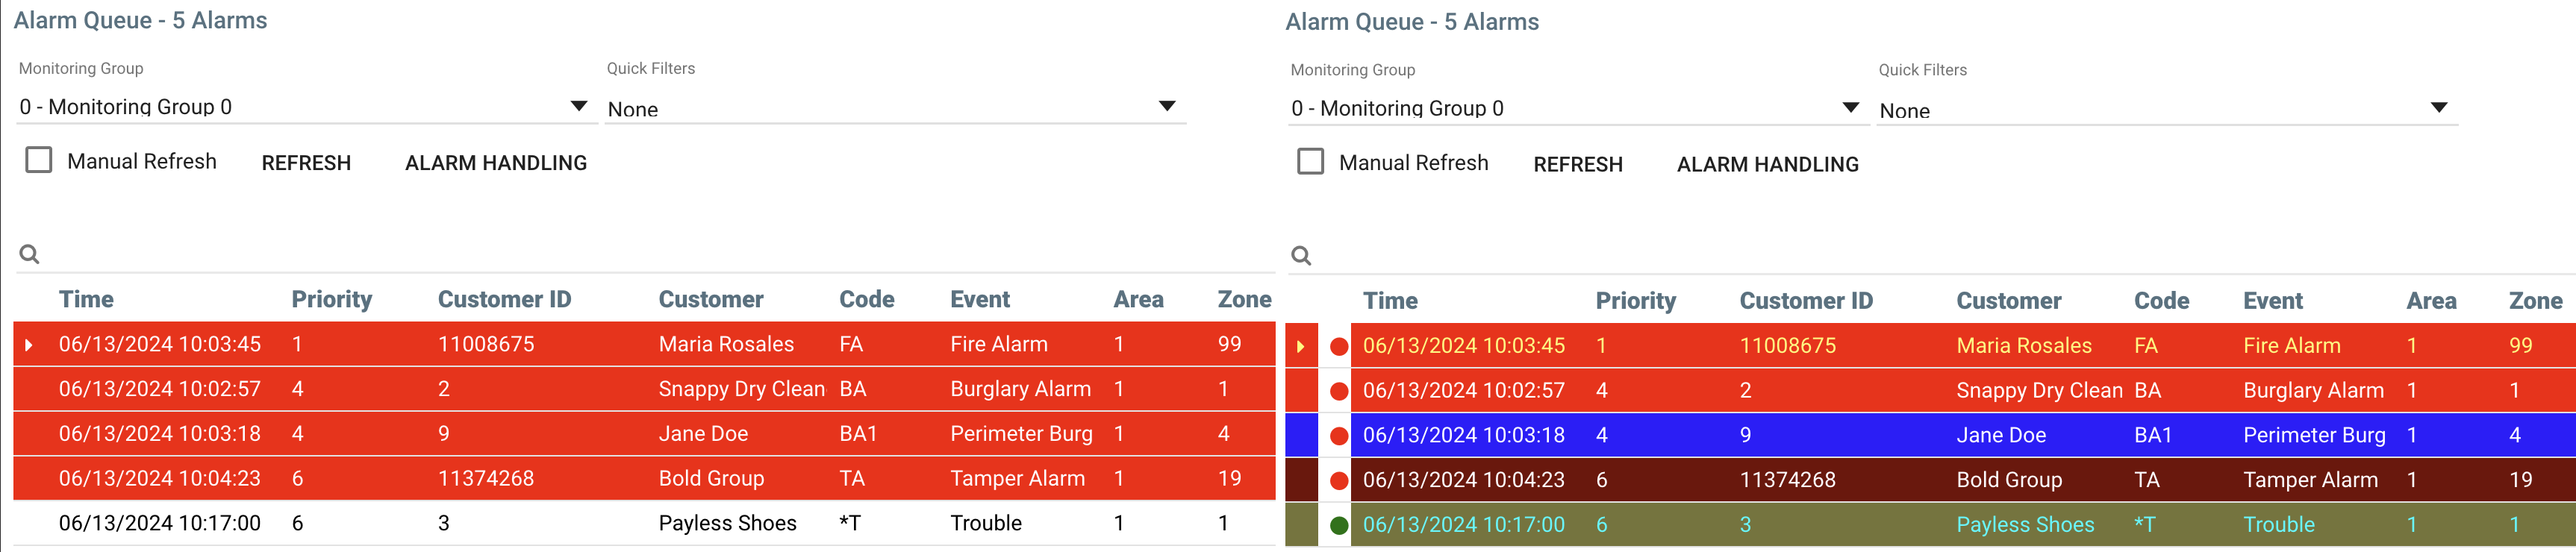 Alarm Queue with Age Based Display on Left and with Event Based Display on Right
Both of the above methods have a way of communicating the age of the alarm, or how long it has been available.
In the Age Based display (left side), the color of the line itself represents the age of the alarm. As is shown in the screenshot, black text on white indicates a new Alarm. Black text on yellow indicates an alarm that has been sitting beyond its Warning Level (Warning Level is 90 seconds by default), meaning the Alarm has been available for at least a minute and a half and nobody has opened the Alarm. White text on Red indicates an Alarm that has aged beyond its Danger Level (Danger Level is 180 seconds by default), meaning the Alarm has been available for at least three minutes and nobody has opened it. A pink line represent a new alarm that is “high priority”. Grey text on white indicates an Alarm that is being handled by an operator. White text on black indicates an Alarm that meets the requirements for Disaster Event.
 Alarm Queue Color Legend, when Alarm Queue shows Age-Based color scheme
In the Event Based display (right side), the color of the line is dictated by the event, but the age is still represented by the small dot to the left of the Alarm Queue. A green dot represents a new Alarm. A yellow dot represents an Alarm that has passed its Warning Level. A red dot represents an Alarm that has passed its Danger Level. A pink dot represents a new Alarm that is “high priority”. A grey dot represents an alarm that is being handled by an operator. A black dot represents an alarm that meets the requirements for a Disaster Event.
 Alarm Queue Color Scheme, when Alarm Queue Shows Event-Based color scheme
Alarm Queue Color Legend, when Alarm Queue shows Event-Based color scheme
As mentioned previously, the default view of the Alarm queue will sort based on priority, then age. The sort order may be changed, though, by clicking the headers at the top of each column. For example, if you want to group the available Alarms by Dealer, you can click the column header labeled Dealer. If you click the same column header multiple times, the view will swap between ascending and descending values for that column. *IMPORTANT* - If you change the sort order, that same sort order will be kept throughout the session. It will only be reset to the default view if you sign out of Manitou, then back in.
With all of the above being said, most Monitoring Centers will not be working from the Alarm Queue screen. It is an excellent tool to see what is available, but most operators, most of the time, want the highest priority available alarm. Or if they are all the same priority, the operator wants the oldest alarm.
Alarm Handling allows this to happen.
Alarm Handling
You can reach the Alarm Handling screen by navigating to the Menu Icon > Operations > Alarm Handling. If you have the shortcut enabled, you may click on the shortcut icon.
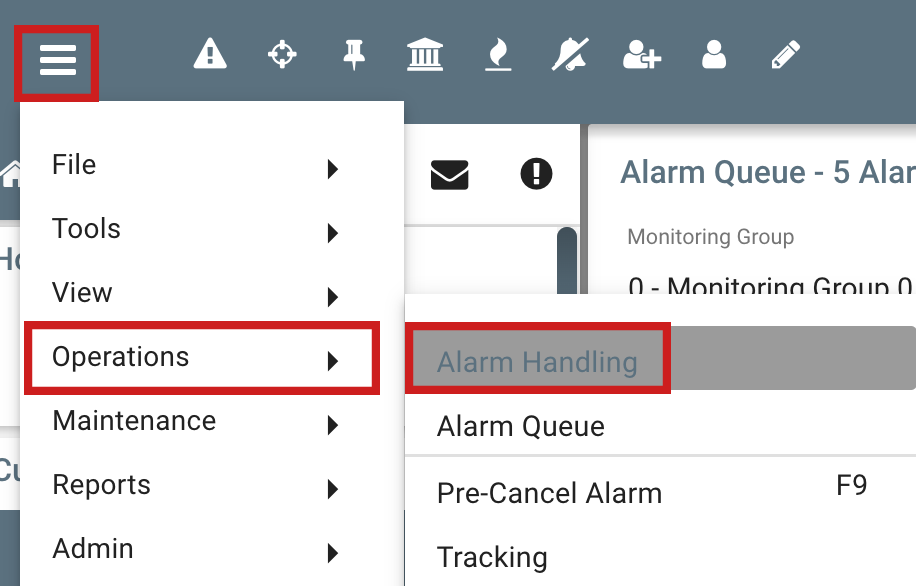 Menu Icon > Operations > Alarm Handling
 Alarm Handling Shortcut Icon (your system may or may not display this)
Once in the Alarm Handling screen, an operator will either be waiting (if the spinning icon is spinning and no other dialogs are visible), or they will be asked if they would like to handle an alarm. The alarm being offered is the one that was at the top of the Alarm Queue screen because it is either the highest priority or oldest alarm. The operator has three choices. If they click EXIT, Manitou will remove this operator from Alarm Handling mode, meaning they will no longer be offered any alarms. If they click PAUSE, the screen will go away, but since the Alarm Handling has been paused, they will not be offered any new alarms. Clicking YES will bring the next available alarm to the screen. While in Alarm Handling mode, the same dialog is shown to all operators who are available, and the first person to click YES gets the new alarm.
 Dialog showing "Would you like to handle this alarm?"
Before we get to the actual alarm, it is worth discussing some of the options on the Alarm Handling screen. The Get Alarm Type selection allows the operator to select if they are offered only New Alarms, only previously Viewed Alarms, or both. Auto-get will, instead of offering the dialog asking if the operator wants the alarm, push the alarm to the operator. Because Auto-get doesn’t give the operator an option, it is not practical in smaller monitoring centers. Auto-get is most practical in high-volume monitoring centers where the operators simply need the next alarm. If Alarm Handling is paused, it may be unpaused by unmarking the appropriate box.
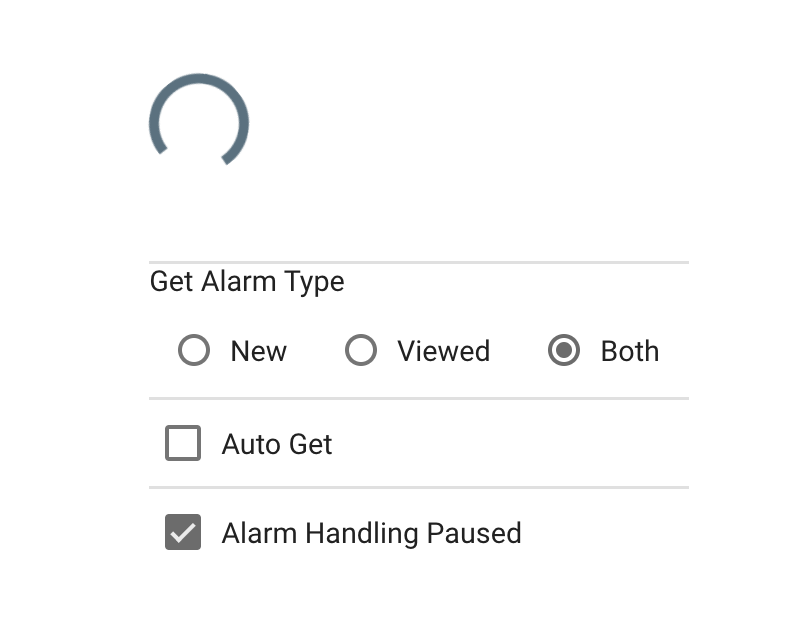 Alarm Handling Options
The Alarm Screen
 The Alarm Screen
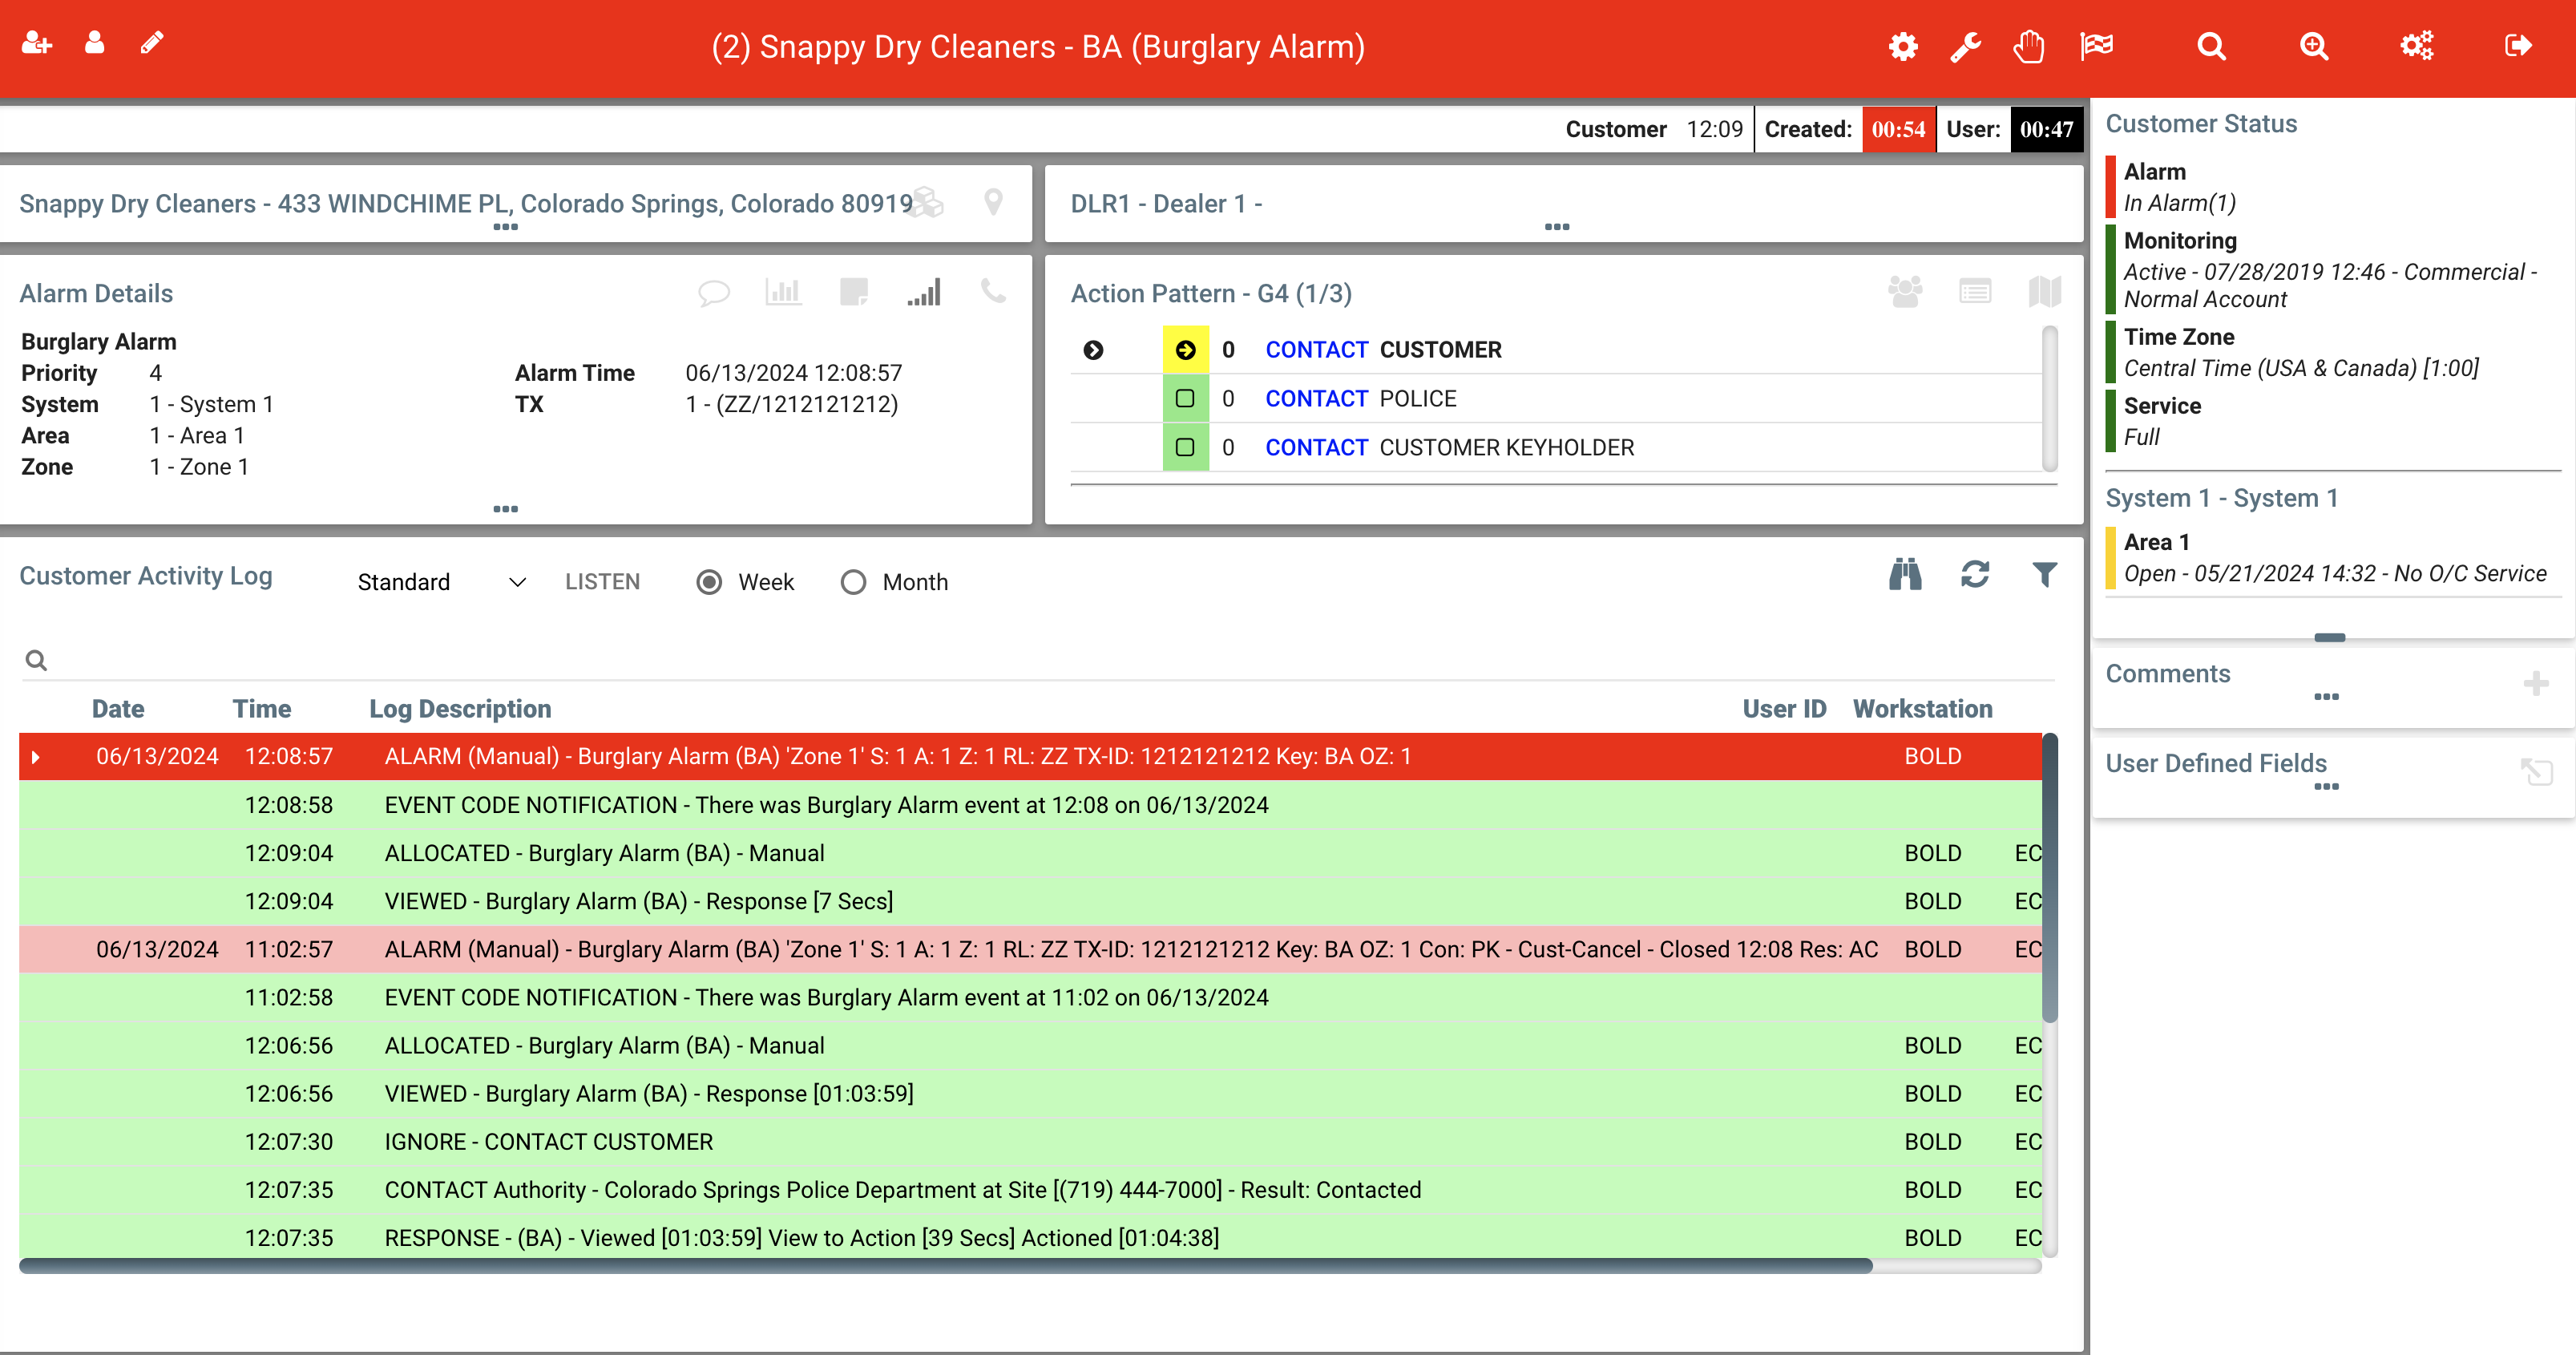
The first time you see the Alarm Screen, it can be a bit overwhelming. There is a lot of information presented, but once you understand how everything works, you’ll see that everything makes sense. The screenshot above shows everything on one page, but we are going to dive into the different parts of this screen and go through each in detail.
A quick note about some menu icons. On the alarm screen, there are four icons in the title bar, near the top right. These are a single gear, a wrench, a hand, and a checkered flag. The Single Gear is the Operations Menu. The Wrench icon is the Action menu. The Hand icon is the Hold Menu. The Checkered Flag is the Finish menu. We will use some of these throughout this documentation.
 Shortcut Icons (From Left to Right, Operations, Actions, Hold, Finish)
The Action Pattern (part 1)
 The Action Pattern
The Action Pattern is the steps the operator should follow to handle an alarm. Not only can it direct operators to call responsible parties, but can be used to prompt operators for questions, change the action pattern based on the results of questions, launch external application, and so much more.
We will be discussing how an operator uses the Action Pattern in part 2, but there are five things the operator should look at before they start. These are things that will be helpful for the operator, so it is important to look at them. But they are not so important that the operator needs to spend unnecessary time on them. All of the following sections can be glanced at, and often understood, in less than five seconds.
Customer Information
 Customer Information, unexpanded
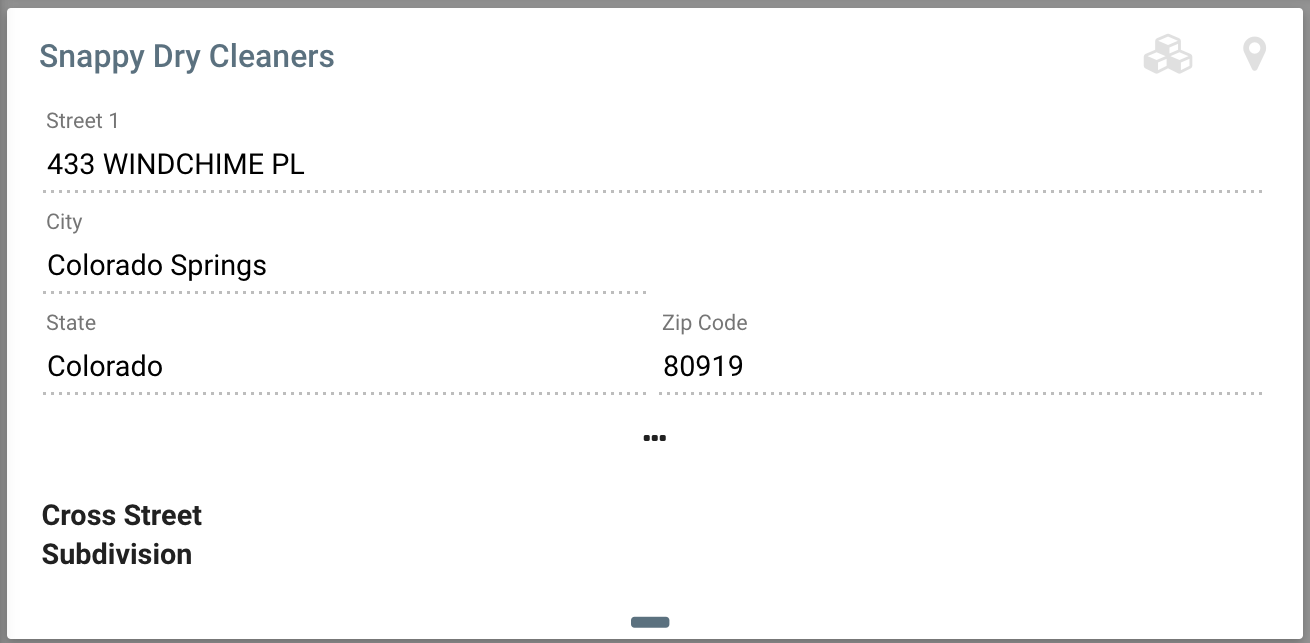 Customer Information, expanded
The very first thing you want to know is which customer has the Alarm. The top left of the Alarm Screen shows the Customer Information. This is the location of the customer that has the alarm. By default, this box shows the Customer Name, Street Address, City, State/Region, and Zip/Post Code. Because it shows the complete address, it is often not necessary to expand the section out. If, however, your monitoring center uses the Cross Street or Subdivision fields along with the address, operators will need to click one time on any part of the Customer Information that is not an icon to expand it. The first screenshot shows the Customer Information in its default collapsed state. The second screenshot shows it expanded.
Alarm Details
 The Alarm Details Section
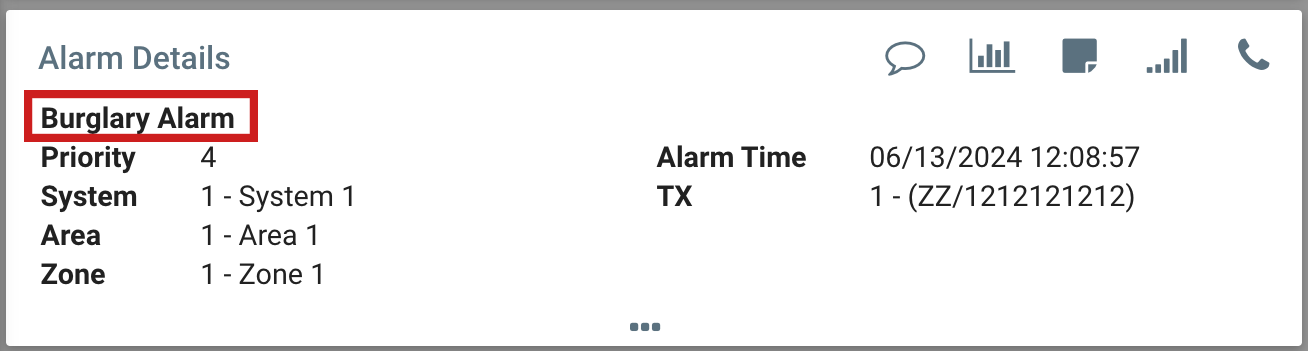
Now that you know which customer has the alarm, you want to know what kind of alarm this is. Below the Customer Information is the Alarm Details. The most important thing in the Alarm Details section is just below the words Alarm Details. As shown in the second screenshot, this is the type of alarm. Examples of what you might see here might be anything from Burglary Alarm, to Trouble Alarm, to Late to Close. This information is so important that the title bar portion of the screen changes color and also includes the Alarm Type.
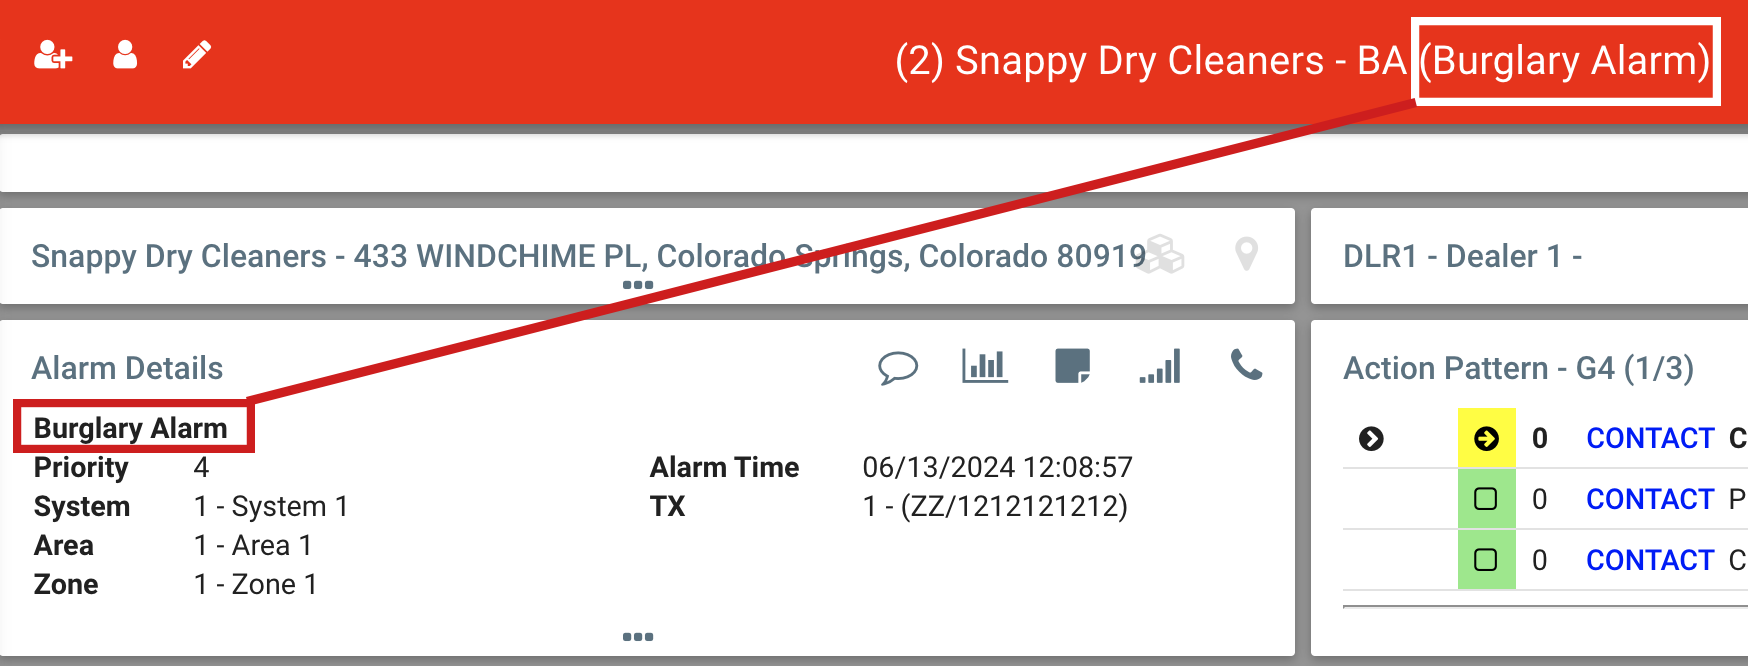 Alarm Type Shown in Both Alarm Details Section and Title Bar
Customer Status
 Customer Status
Now that you know who the customer is, and what kind of alarm this is, the next thing you want to know is how many alarms this customer has. The top right section with the red and green marks includes an item labeled In Alarm, with a number in parentheses. This number is the number of alarms that the customer currently has. If this number is anything other than 1, there are more alarms for this customer. The additional alarms may be low priority like Trouble/Supervisory alarms. We won’t know until the next section what they are, but if the number is anything other than 1, pay attention!
Activity Log
 Activity Log
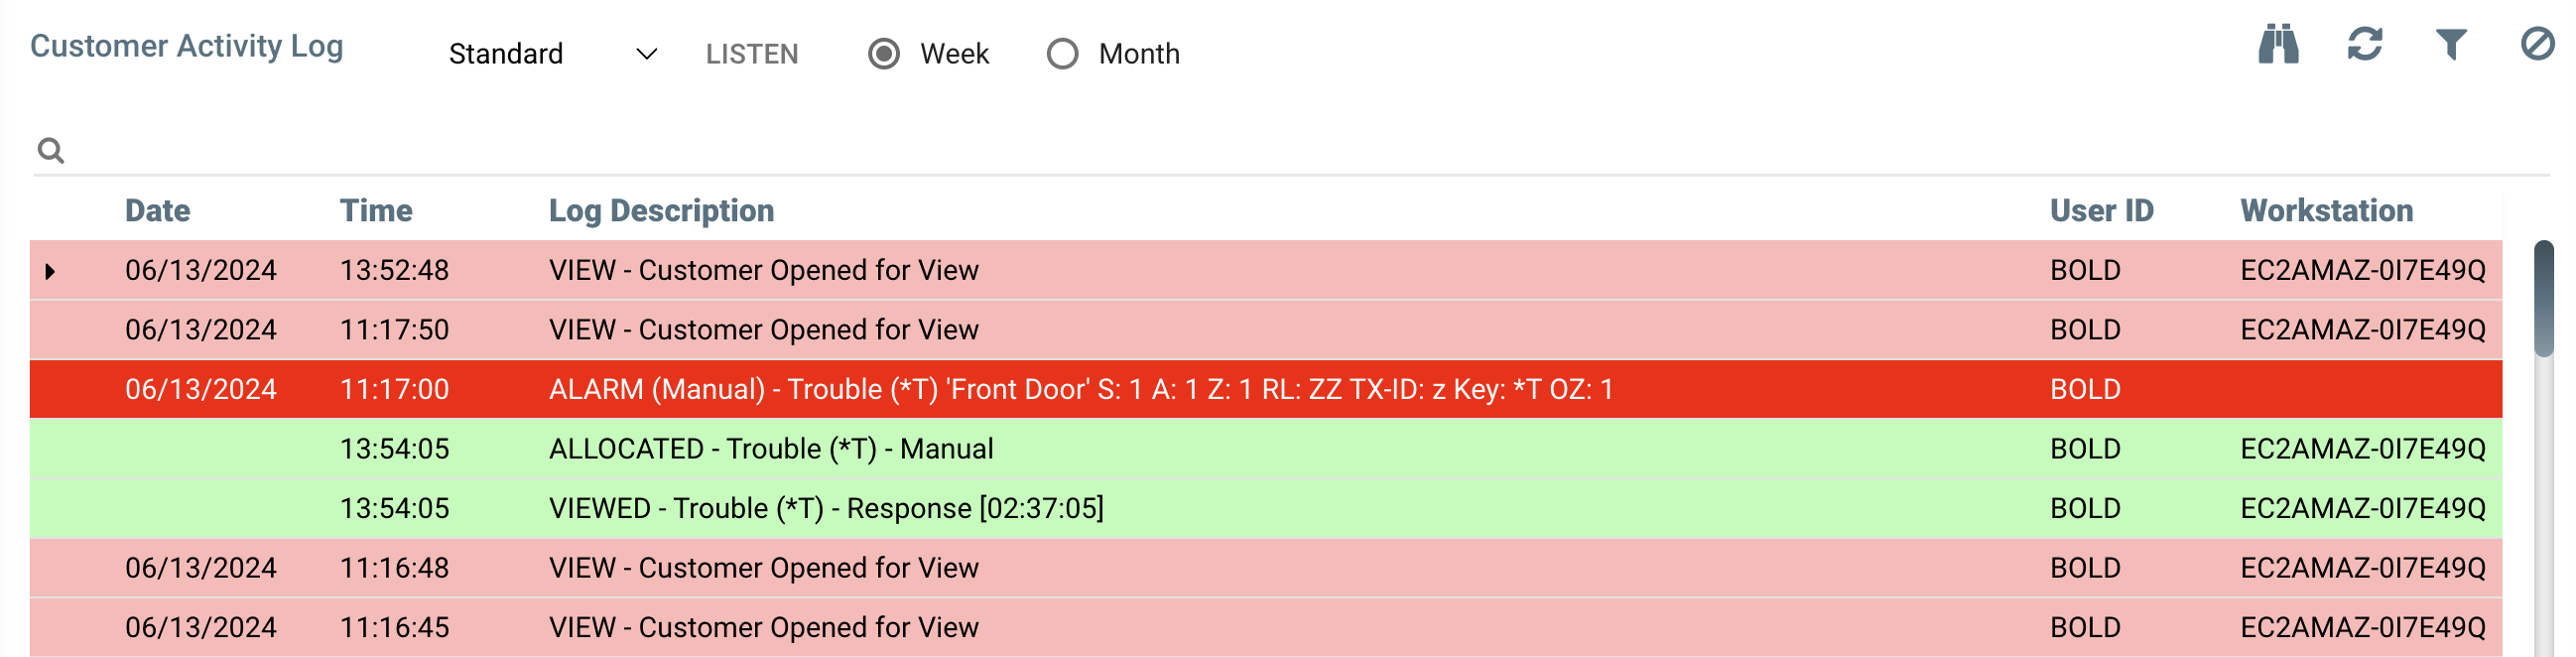
You know who the customer is, what kind of alarm this is, and how many alarms this customer has. The bottom half of the alarm screen shows the Activity Log. Among other things, the Activity Log will tell you what the other alarms are (if the number from the previous step was anything other than 1). The easiest way to read the Activity Log is first to look at the colors. There are lines that are pink, yellow, blue, white, red, orange and green. If the colors of the lines are NOT green, the most recent item is at the top of the screen, and oldest at the bottom. Green lines, however, are different because they are only details for whatever is immediately above them. In this example, there are two green sections, and a lot of other colors.
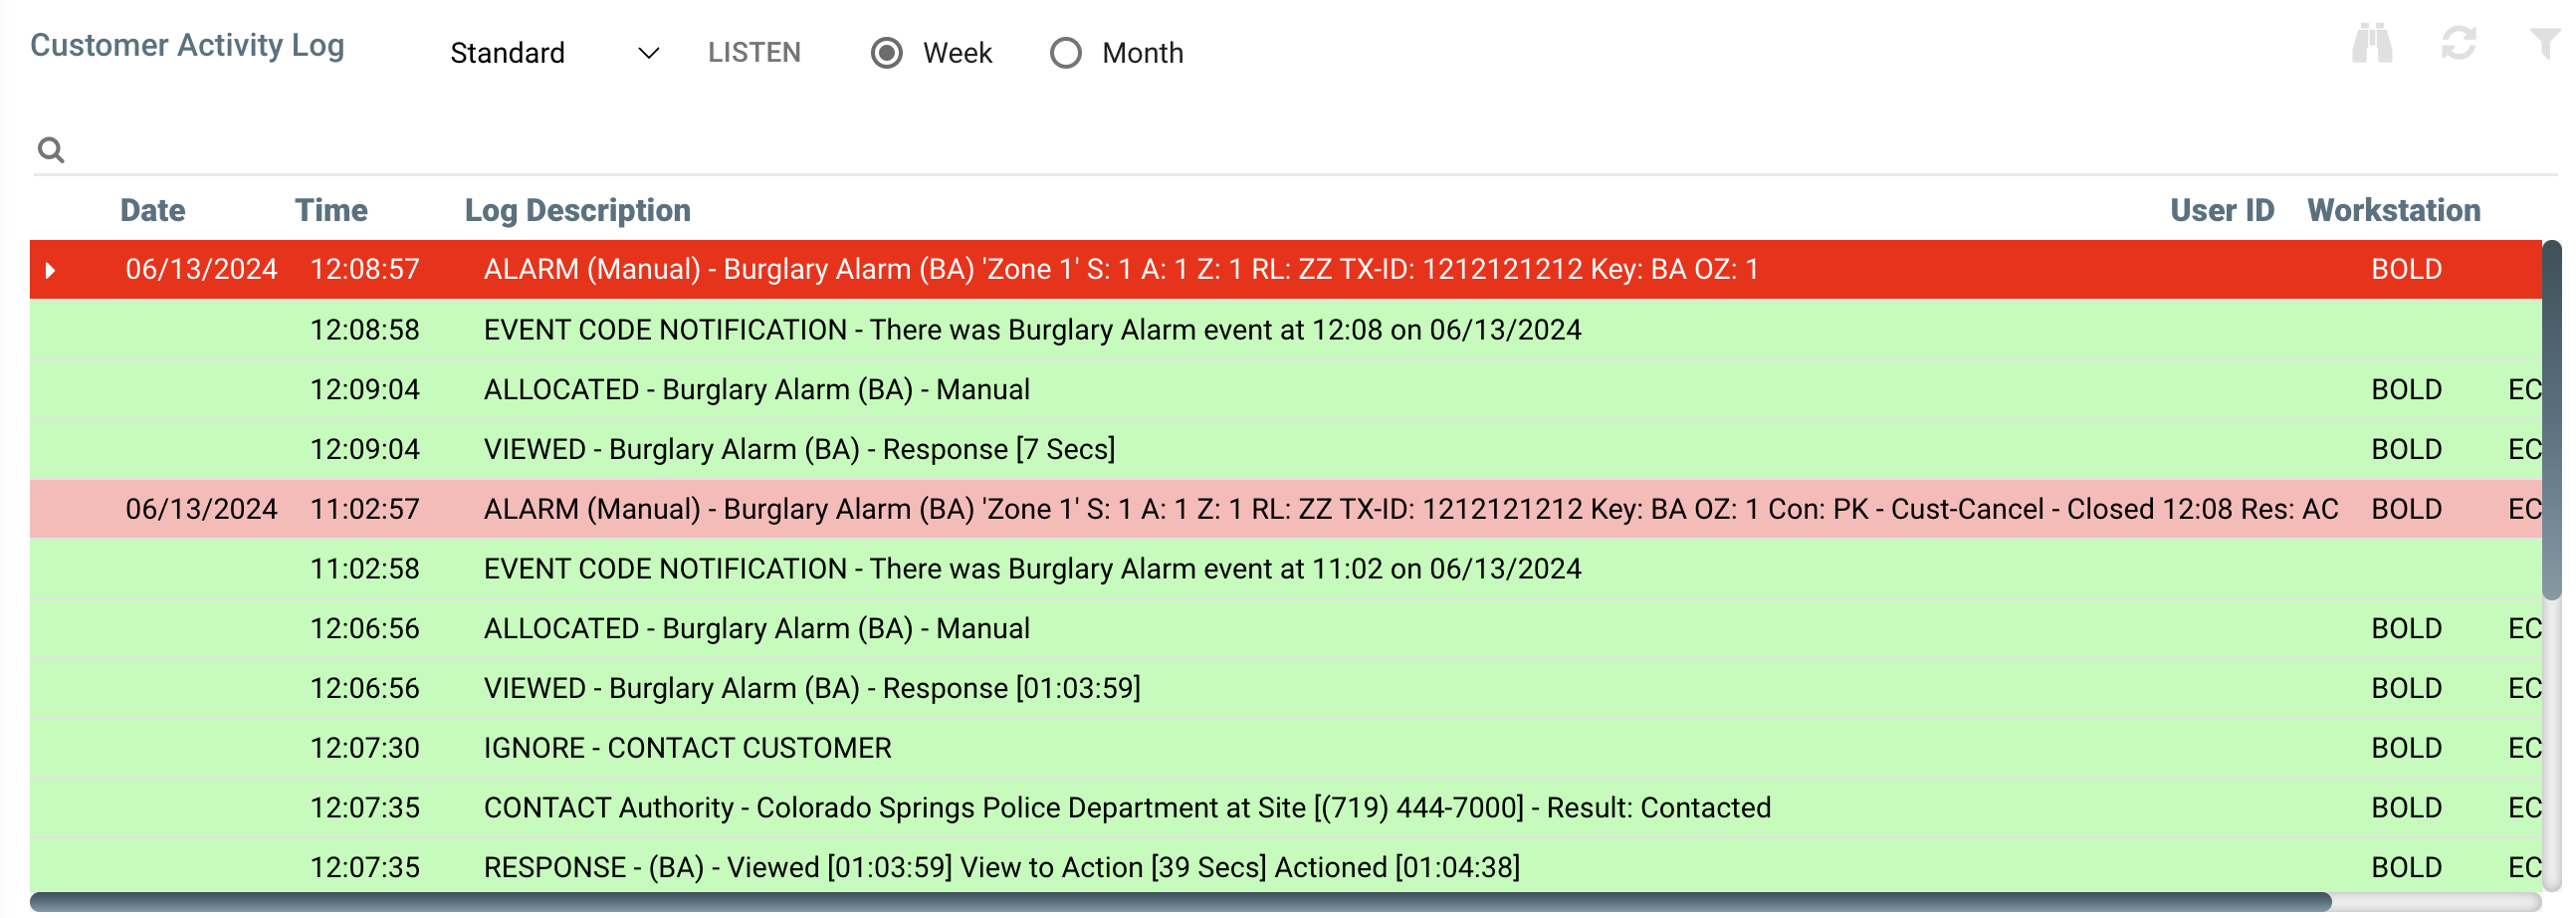 An Activity Log with Two Green Sections
Looking at the other colors shows the most recent item at the top, and the oldest item at the bottom. The first green section is the details related to the event from June 13 at 11:02. The second green section shows the details for the event from June 13 at 12:08.
In the Activity Log, you are looking for anything out of place. Does it look like a lot of signals have come in recently? Was this the same alarm from the same time yesterday? And if there were any other pending alarms, which show up in yellow, you will want to know what they are. There is a world of difference between additional alarms that are Troubles or Supervisories, apart from other high priority alarms.
Additional Alarm Notifications
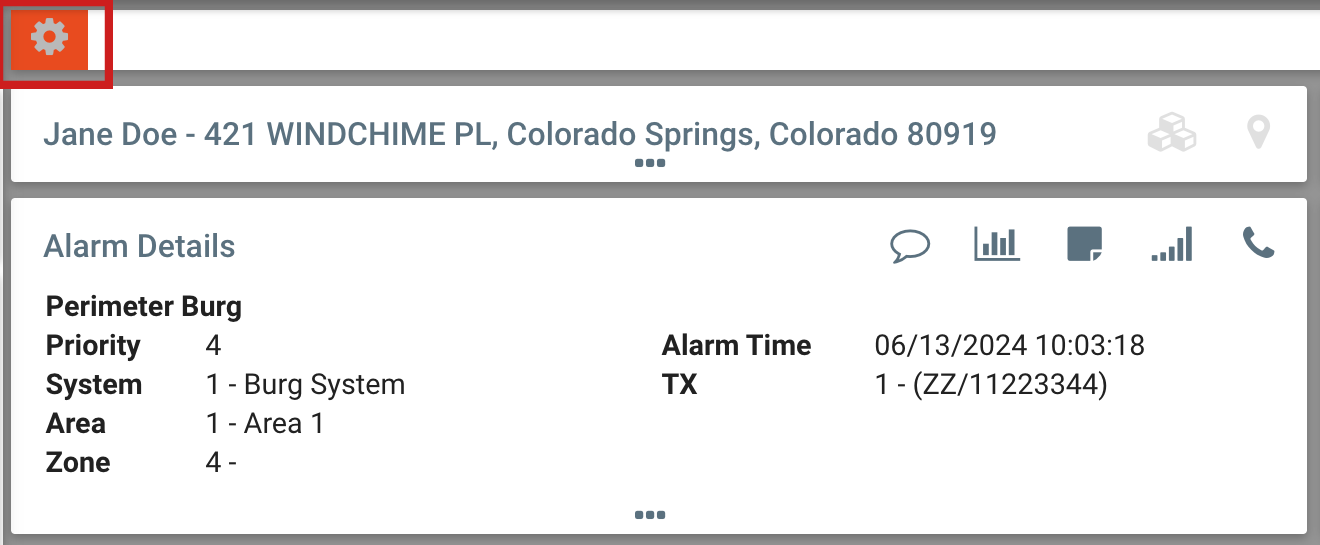 Alarm Notification (will be flashing red/yellow)
You know who the customer is, what kind of alarm this is, how many alarms they have, and what those other alarms are, the last section to look at is in the space just above the Customer Information. If there are any flashing icons in this section, they should be viewed right away. There are a couple dozen possible icons, each representing a different thing. This section is meant to convey any kind of notification that otherwise had no home on the Alarm Screen. Since they won’t be flashing every time, the section is left blank unless there is a notification. The reason this section exists is because of excessive pop-up boxes. Before the Notification section existed, Manitou would communicate information to Alarm Operators via a pop-up box. The problem is that, once a pop-up box is read, and acknowledged, it is difficult to bring back. With the Notification icons, if an Operator needs to re-read one of the notifications, they can simply click on the icon to view it again, even though it may no longer be flashing.
You can now quickly view all of the pertinent details about an alarm by following the flow of the arrows on the screen as shown, and it should happen very quickly. Remember, you are not trying to memorize this information, you are just trying to get it into your head before you start calling people.
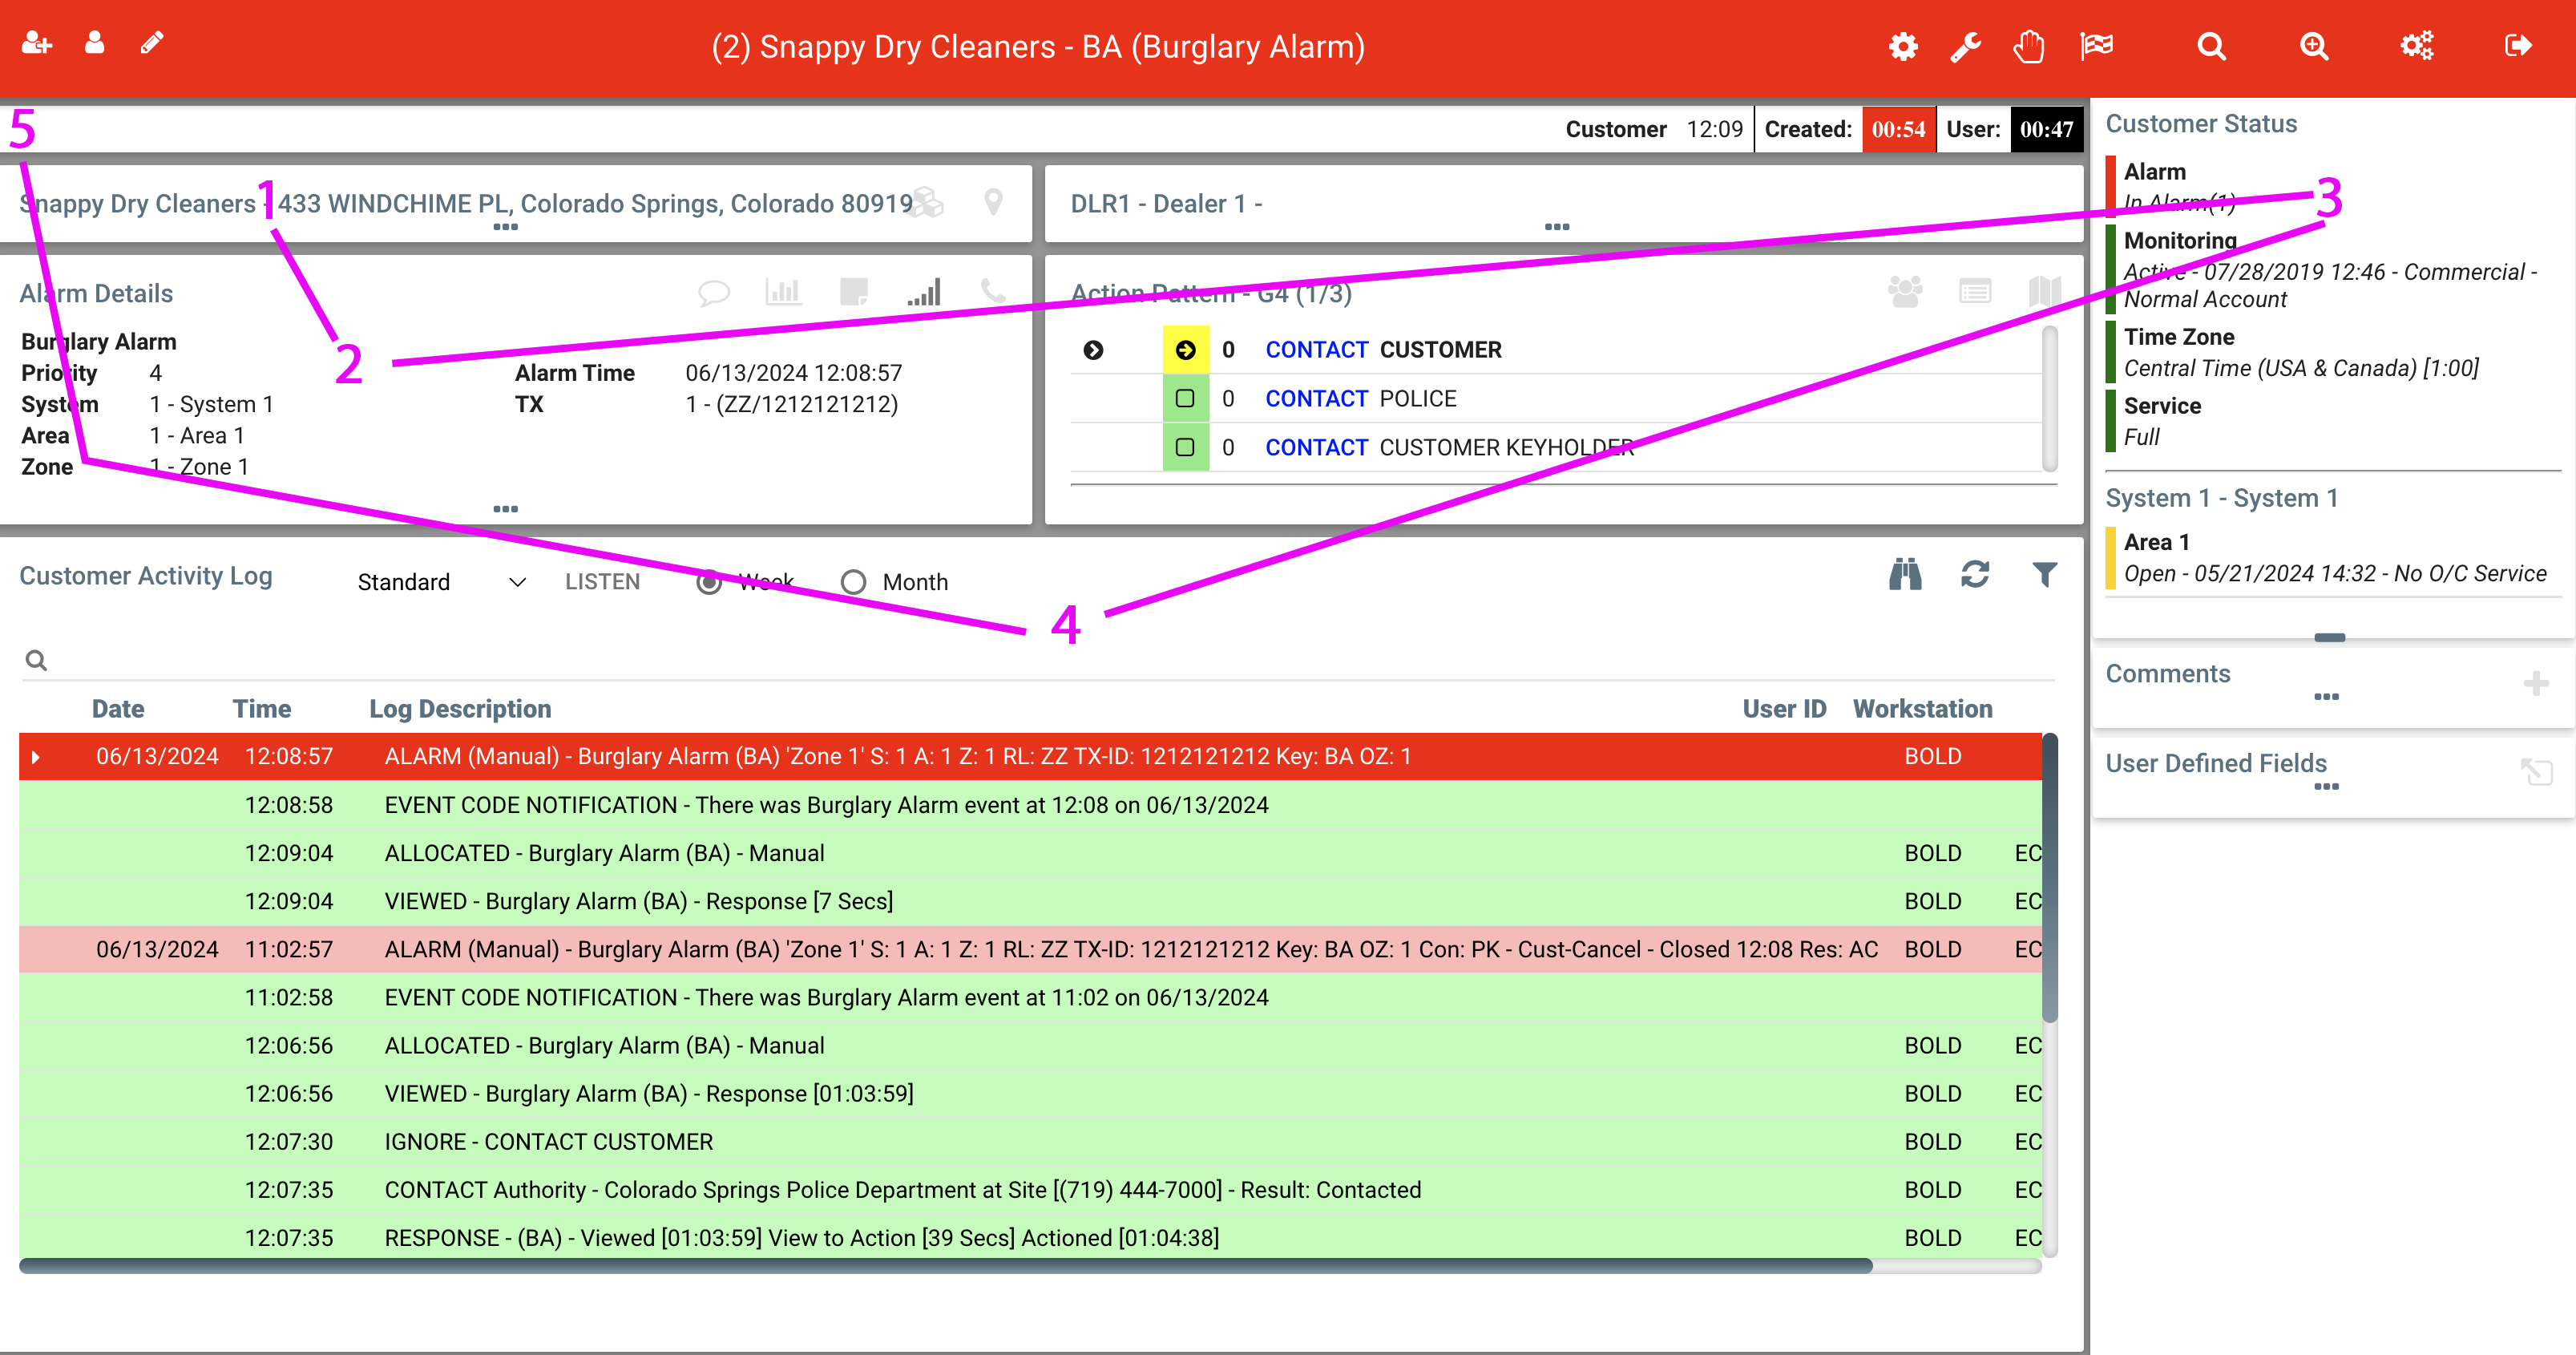 All five items to view before beginning the Action Pattern
The Action Pattern (part 2)
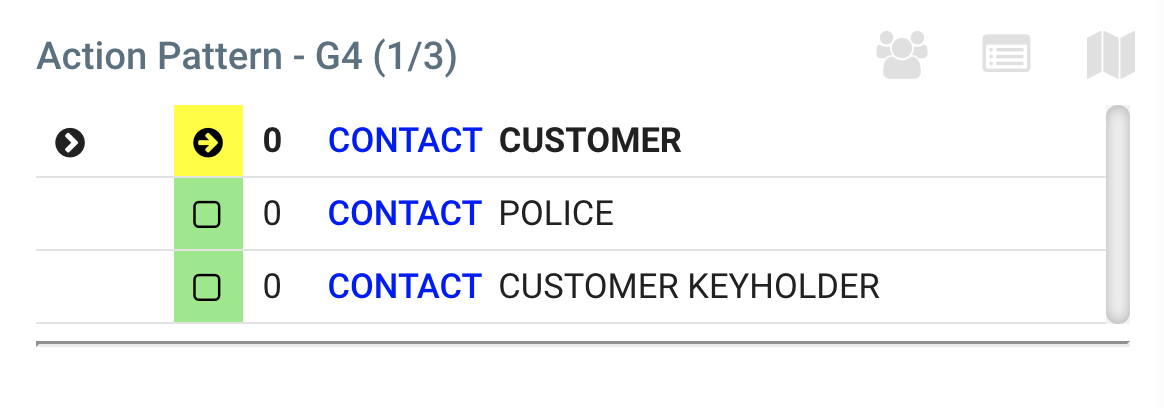 The Action Pattern. This is the same image from above.
 Now that you have viewed the details for this alarm, you can start using the action pattern. At its most basic, the Action Pattern will tell you whom to call in which order. Items that are green have yet to be completed. Items that are yellow are typically the next item. Items that are red have already been completed. Items that are grey are unavailable. Using the Action Pattern with Contact actions are the most common, so we will start with those. By double-clicking on a yellow Contact action will bring the contact screen to the left side.
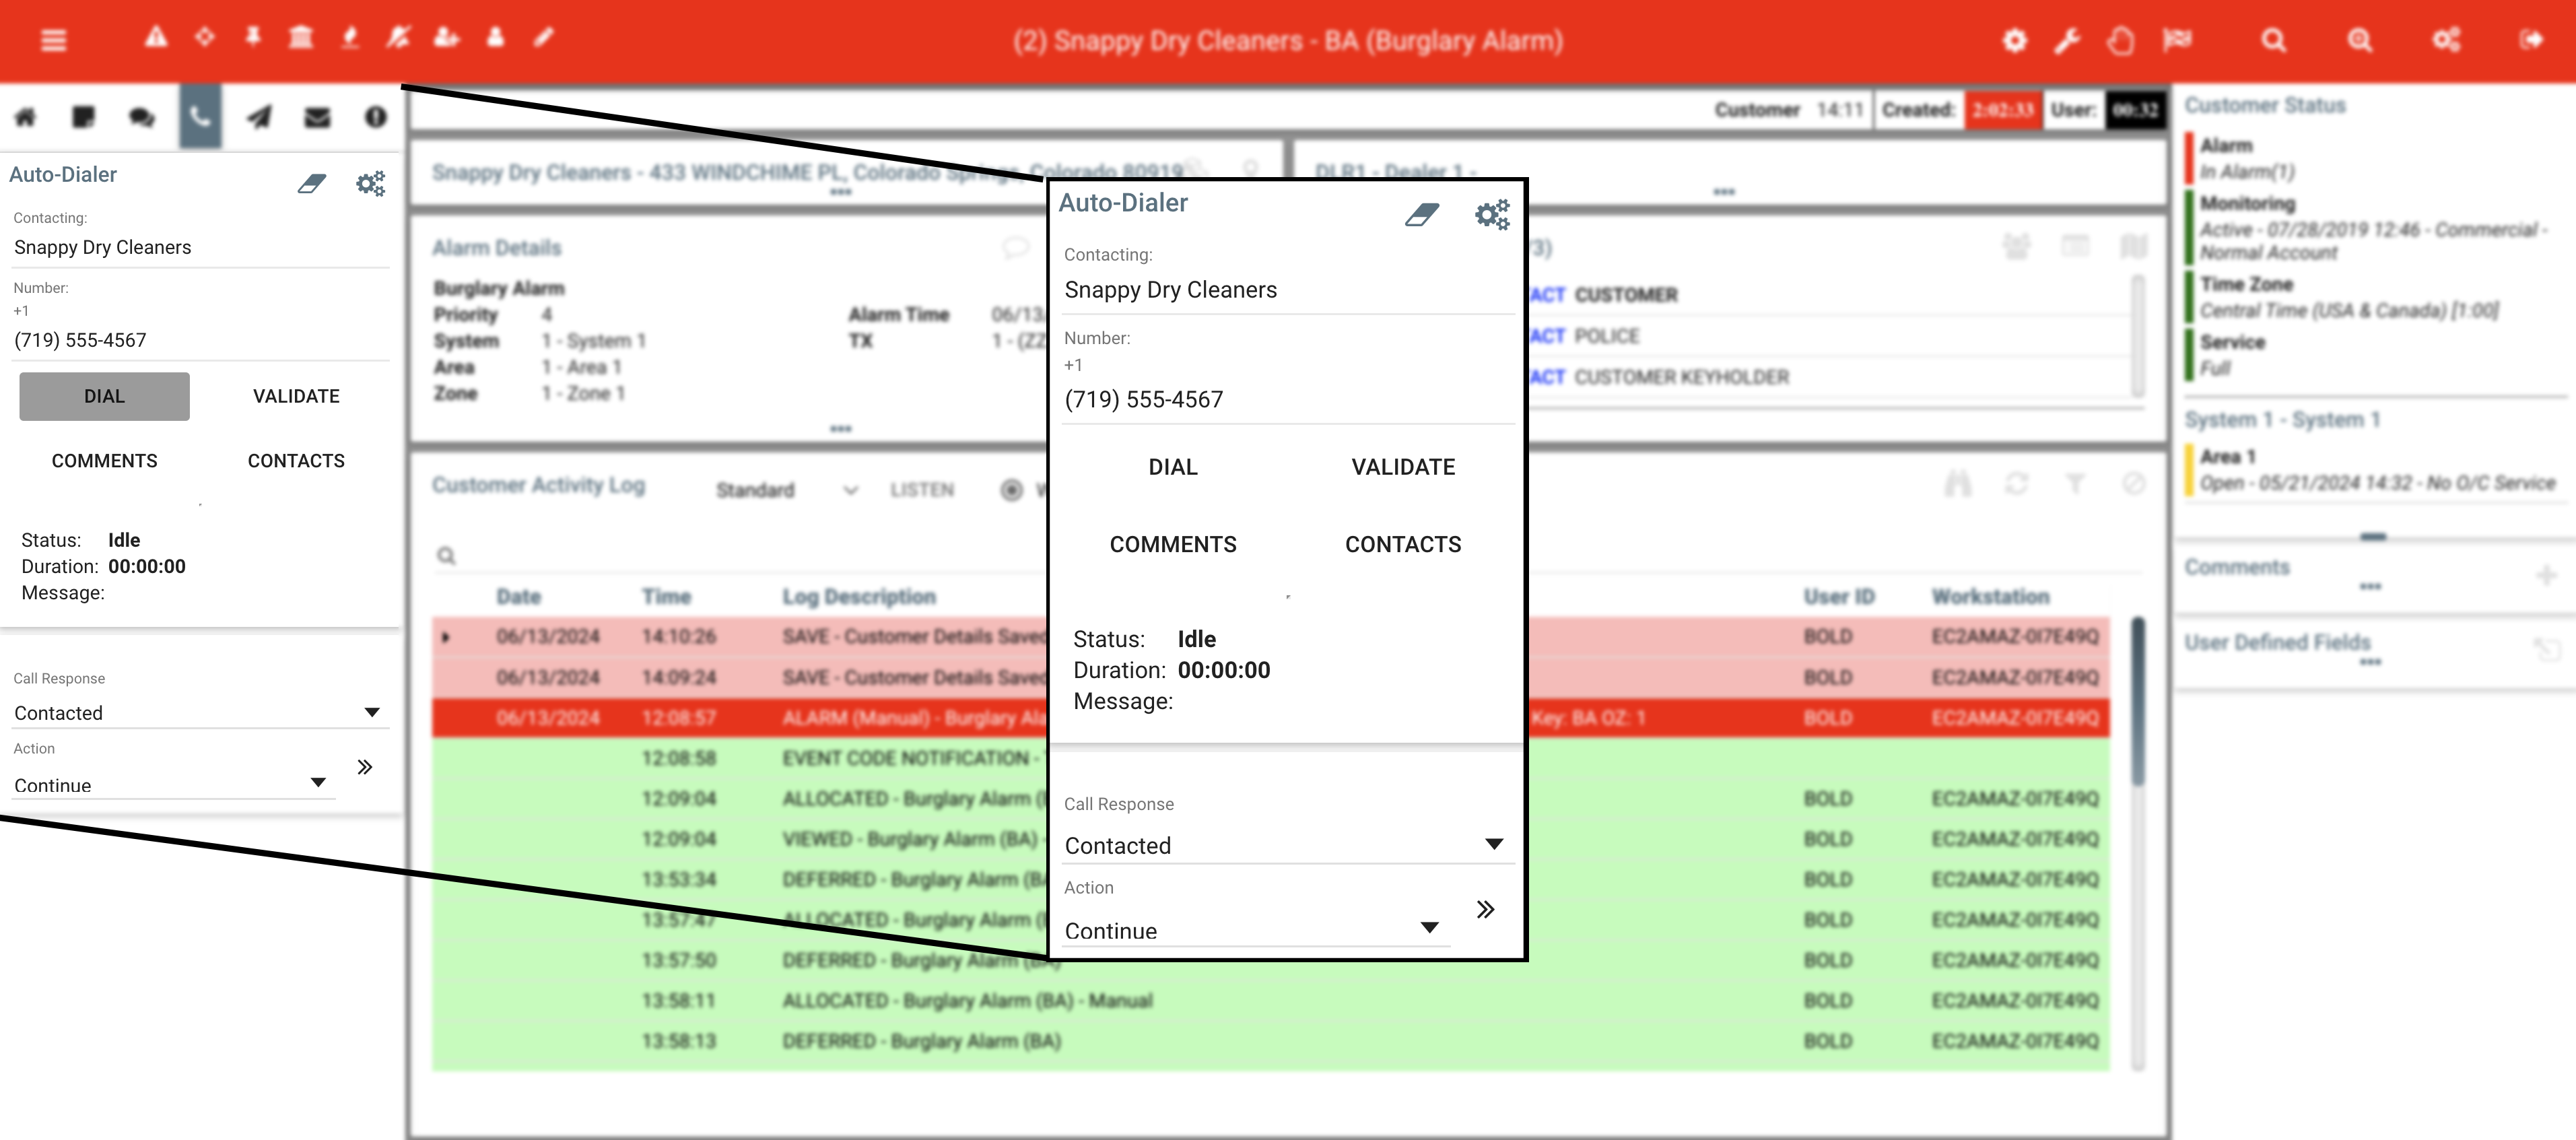 The Auto-Dialer section
Please note that the contact’s name and phone number is at the top of the left side. If your phone system is connected to Manitou, you may be able to use the dial/hangup buttons. Otherwise, simply pick up the handset on your phone and dial as you normally would. The next thing that we need is to select the result of the call. The Call Response section is below the dividing line. It is selected on Contacted by default. If you are calling someone, and you get through, you would leave the selection on Contacted, and click the double arrow below.
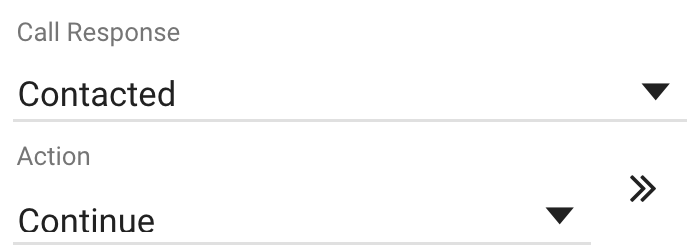 Drop-down menu to select call response, along with Double Arrow
It is also common to attempt a phone call and have different results. Dropping down the menu in the Call Response section will display the following list (note that this list has a scroll bar, and you must scroll to view all entries).
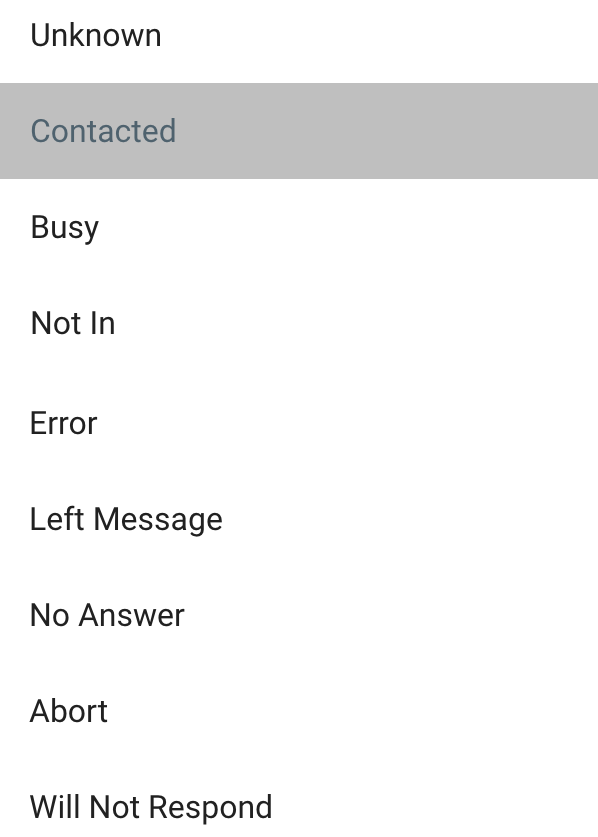 List of Call Response selections. You will need to scroll to view the entire list
If the line was busy, select Busy. If there was no answer, select No Answer. If, however, there is a disconnected recording, choose Error, and select Yes when asked if you would like to create a Maintenance Issue. Maintenance Issues may be viewed later by Data Entry employees, who can call to ask the customer for a new phone number. We now need to continue with the result of Contacted. If you are contacting an authority (Police/Fire/Medical), when you click the double arrow, you will see a window like the one below.
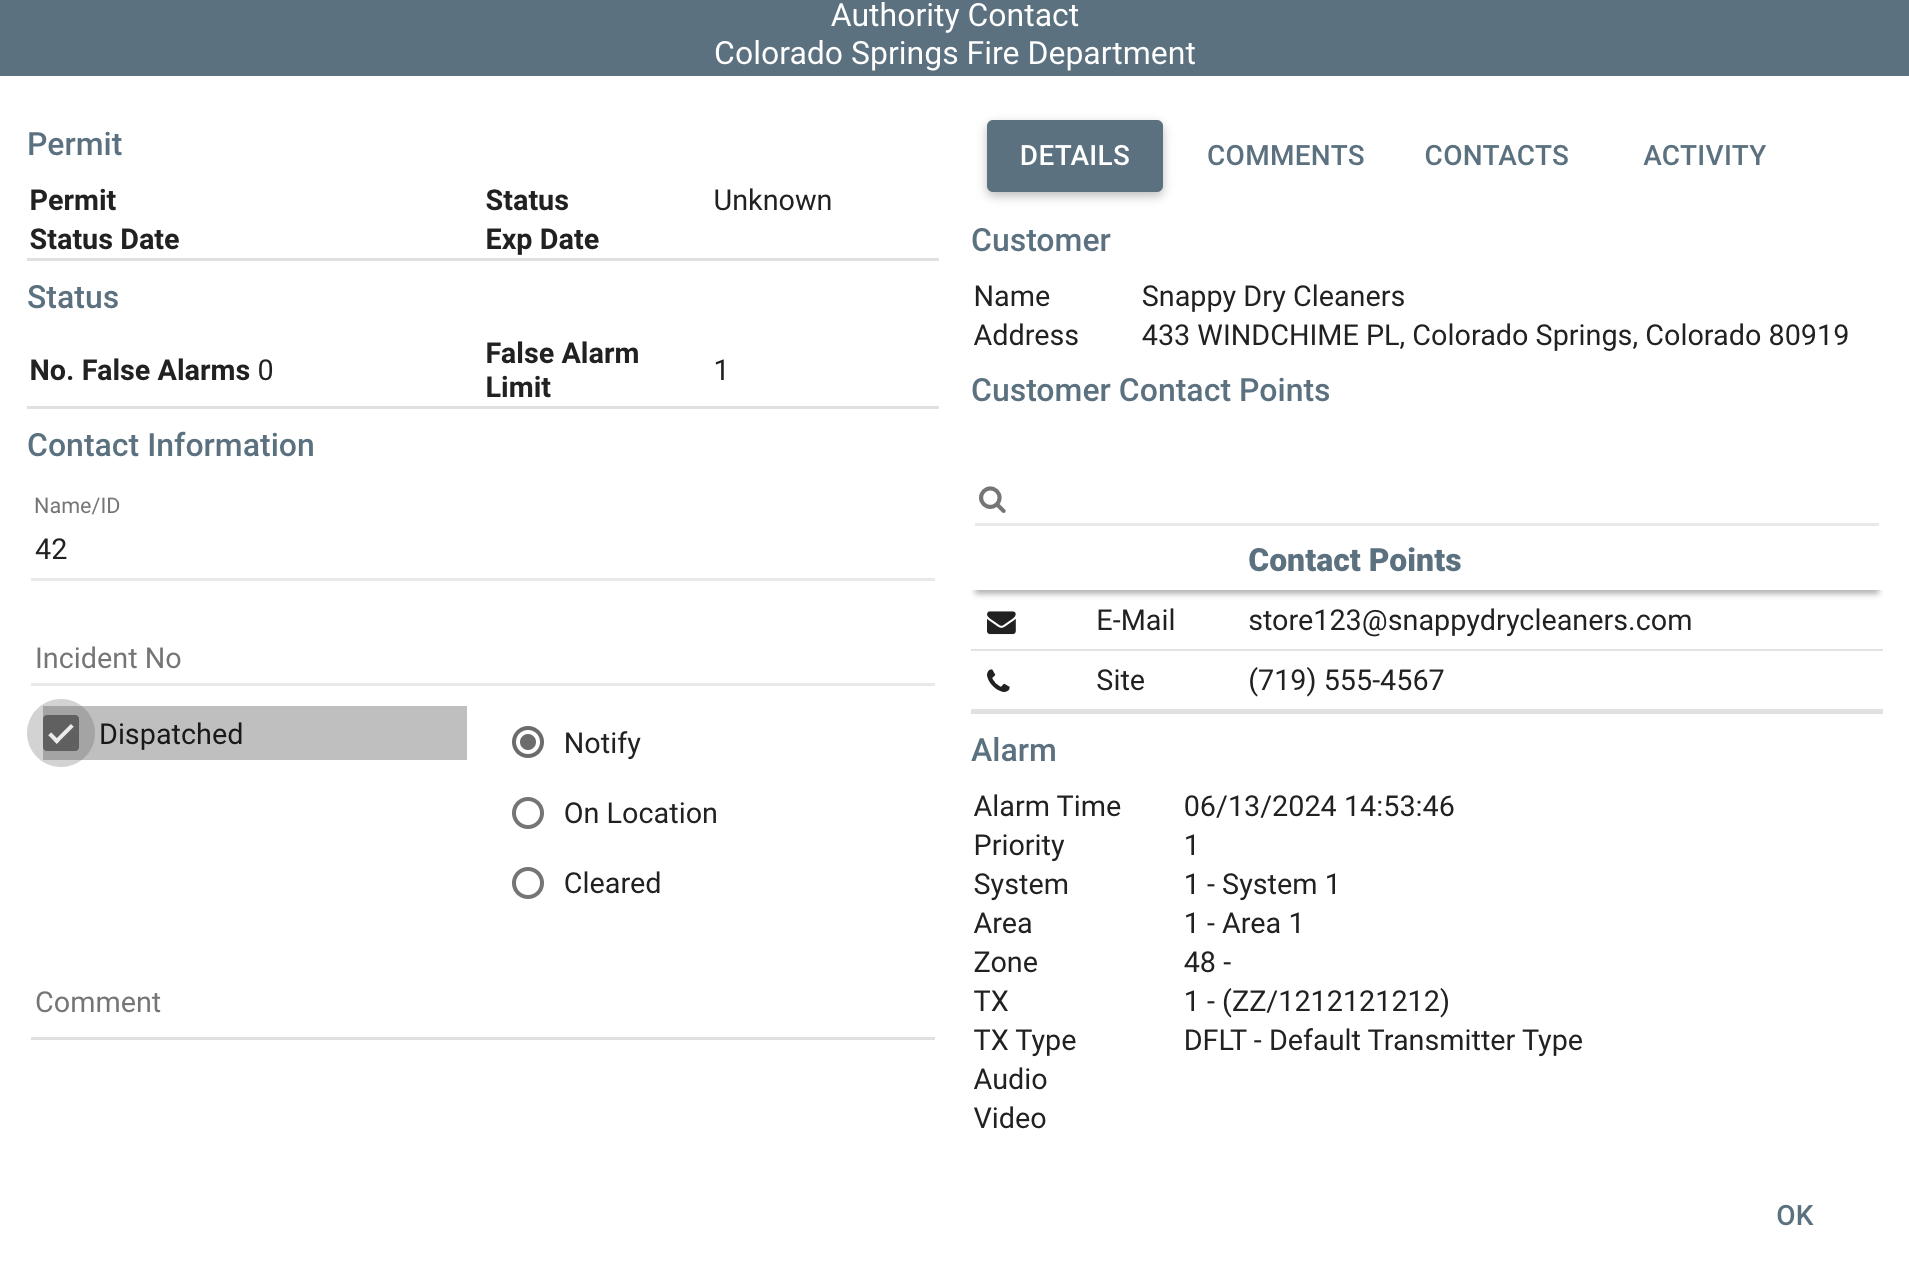 Authority Contact screen, with ID of 42 (dispatcher 42 at Fire Dept), and marking the Dispatched box
Most often, operators will only need to fill out one blank, and mark one box. When speaking to a dispatcher from Police/Fire/Medical, you will be asking for their Name or ID Number. If their name is Smith, you will enter Smith in the Name/ID field. Simply marking the box that says Dispatched is the only other step. Most times, this will work for most operators. If you have requirements to ask for the Incident Number, there is a blank for that. Comments may be typed at the bottom of the left side, but are not usually required. There is also additional information on the right half, under the various tabs. Details is selected by default, and shows the customer name, address, and site phone number along with the alarm details. The Comments tab will show any comments on this customer account. The Contacts tab will show members of the contact list, and Activity will show the recent activity.
When you click OK after entering the Name/ID, you will see the item for contacting the authority is now red, meaning it has been completed. The yellow has moved down, and indicates the next action to be taken. Double-click on this one (Contacting a customer in this example). Choose Contacted, and click the double arrow. When contacting a customer or a contact about the alarm, the screen is different.
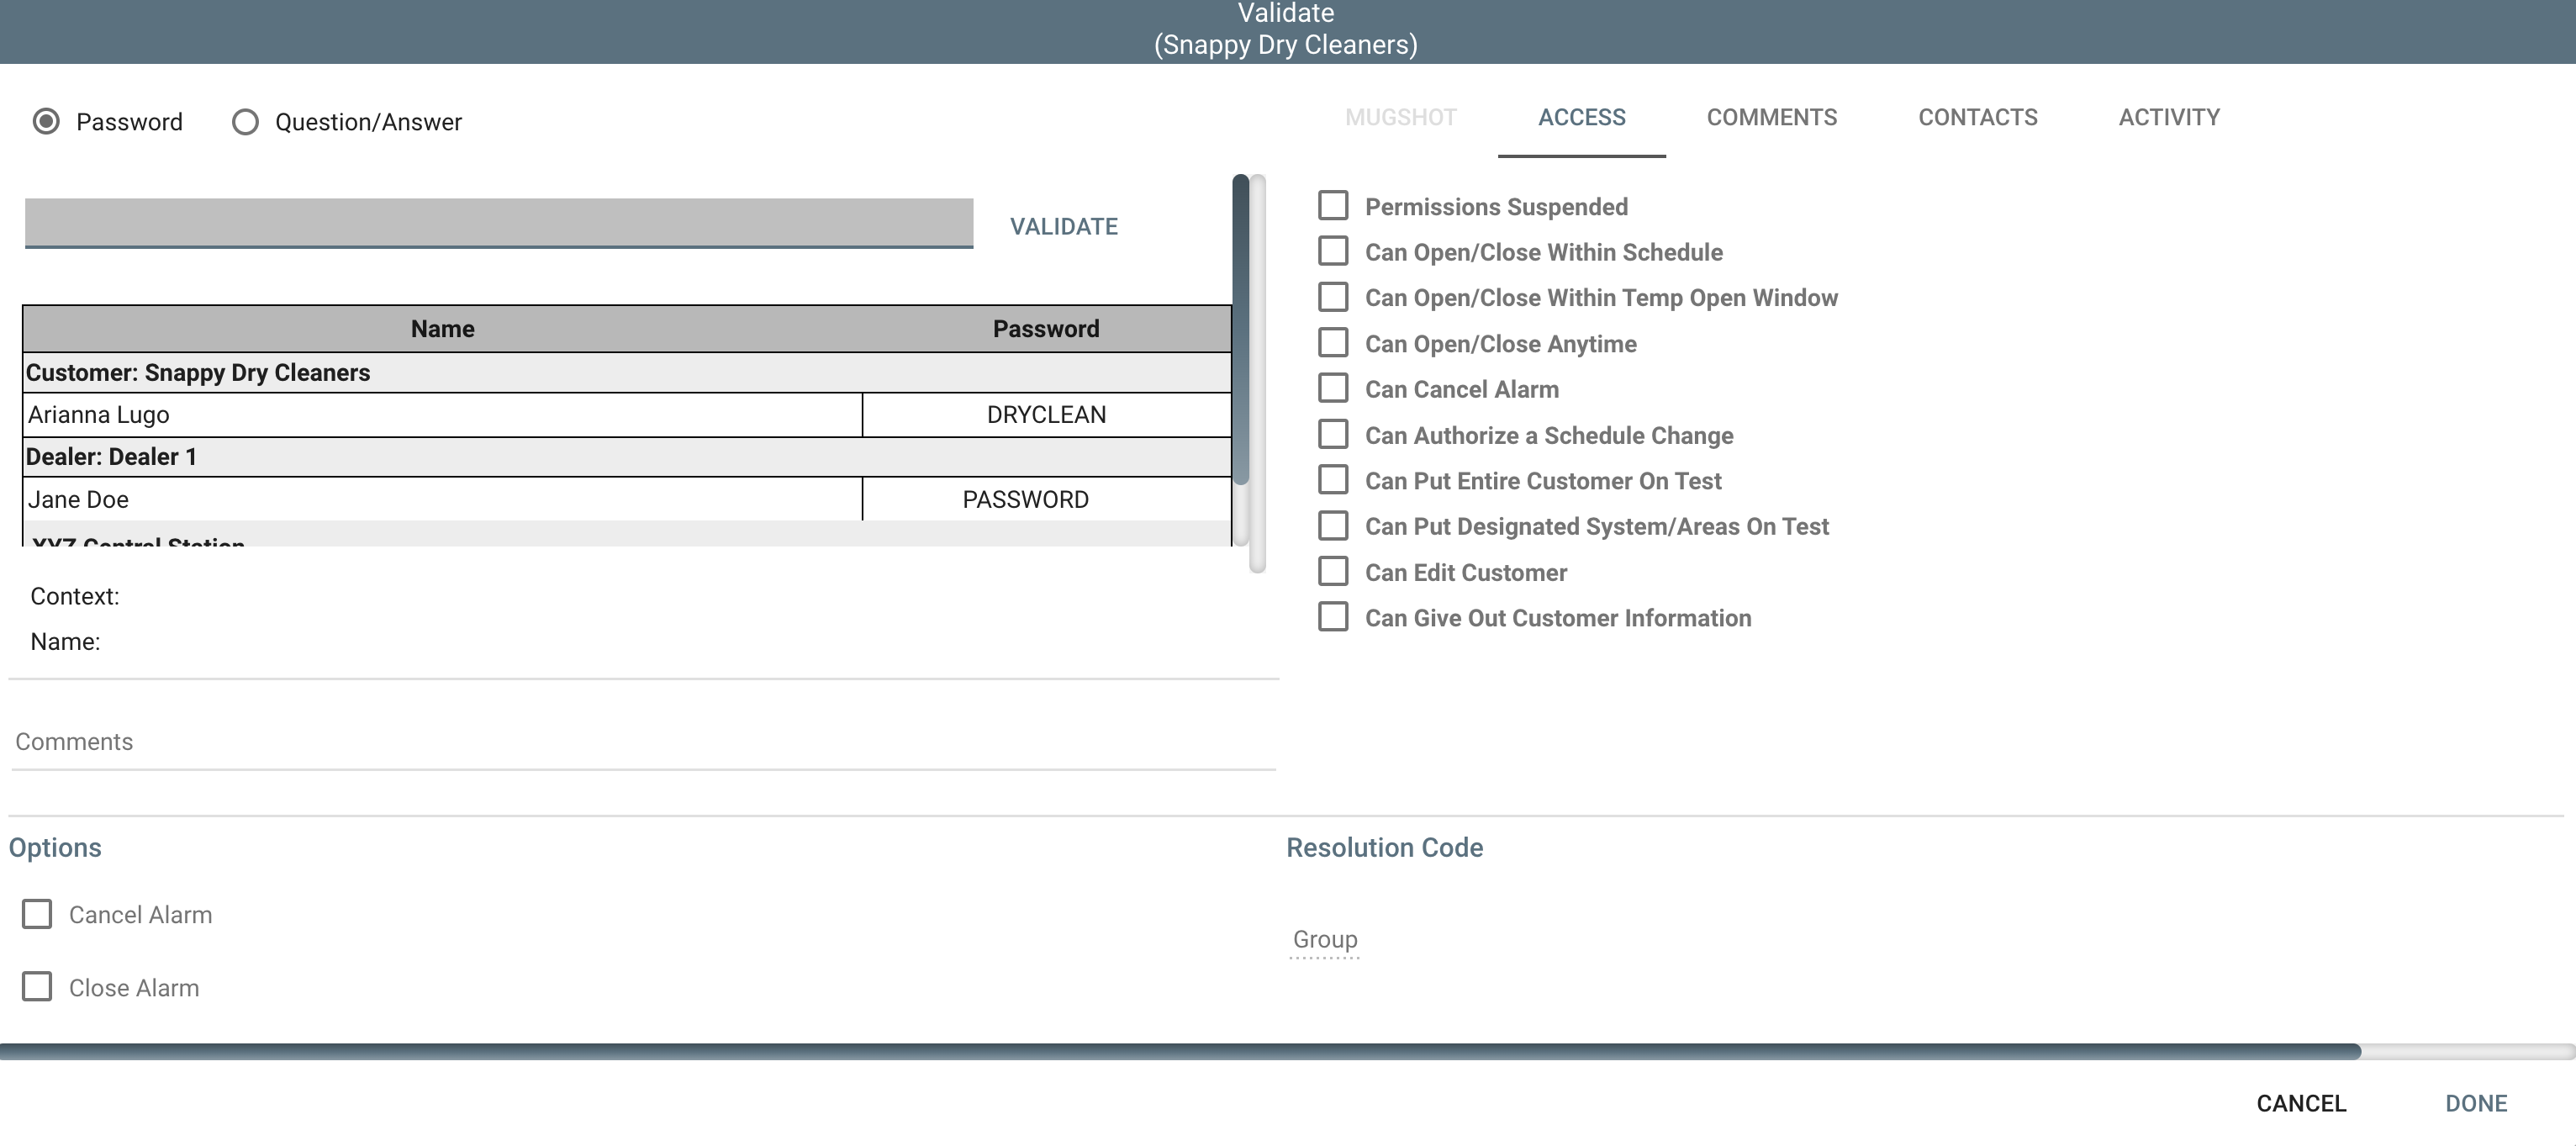 Non-Authority Entity Validate screen
The most common result when contacting the Customer (the premises) or Keyholders (individuals), is to notify of the alarm and ask for a password. If a password is provided, it may be typed in the Password field at the top of the left side, or it may be selected from the list (click on the password, not on the name). Once a password is either typed or selected, click Validate. Next, type what you are told about the cause of the alarm in the Comments field.
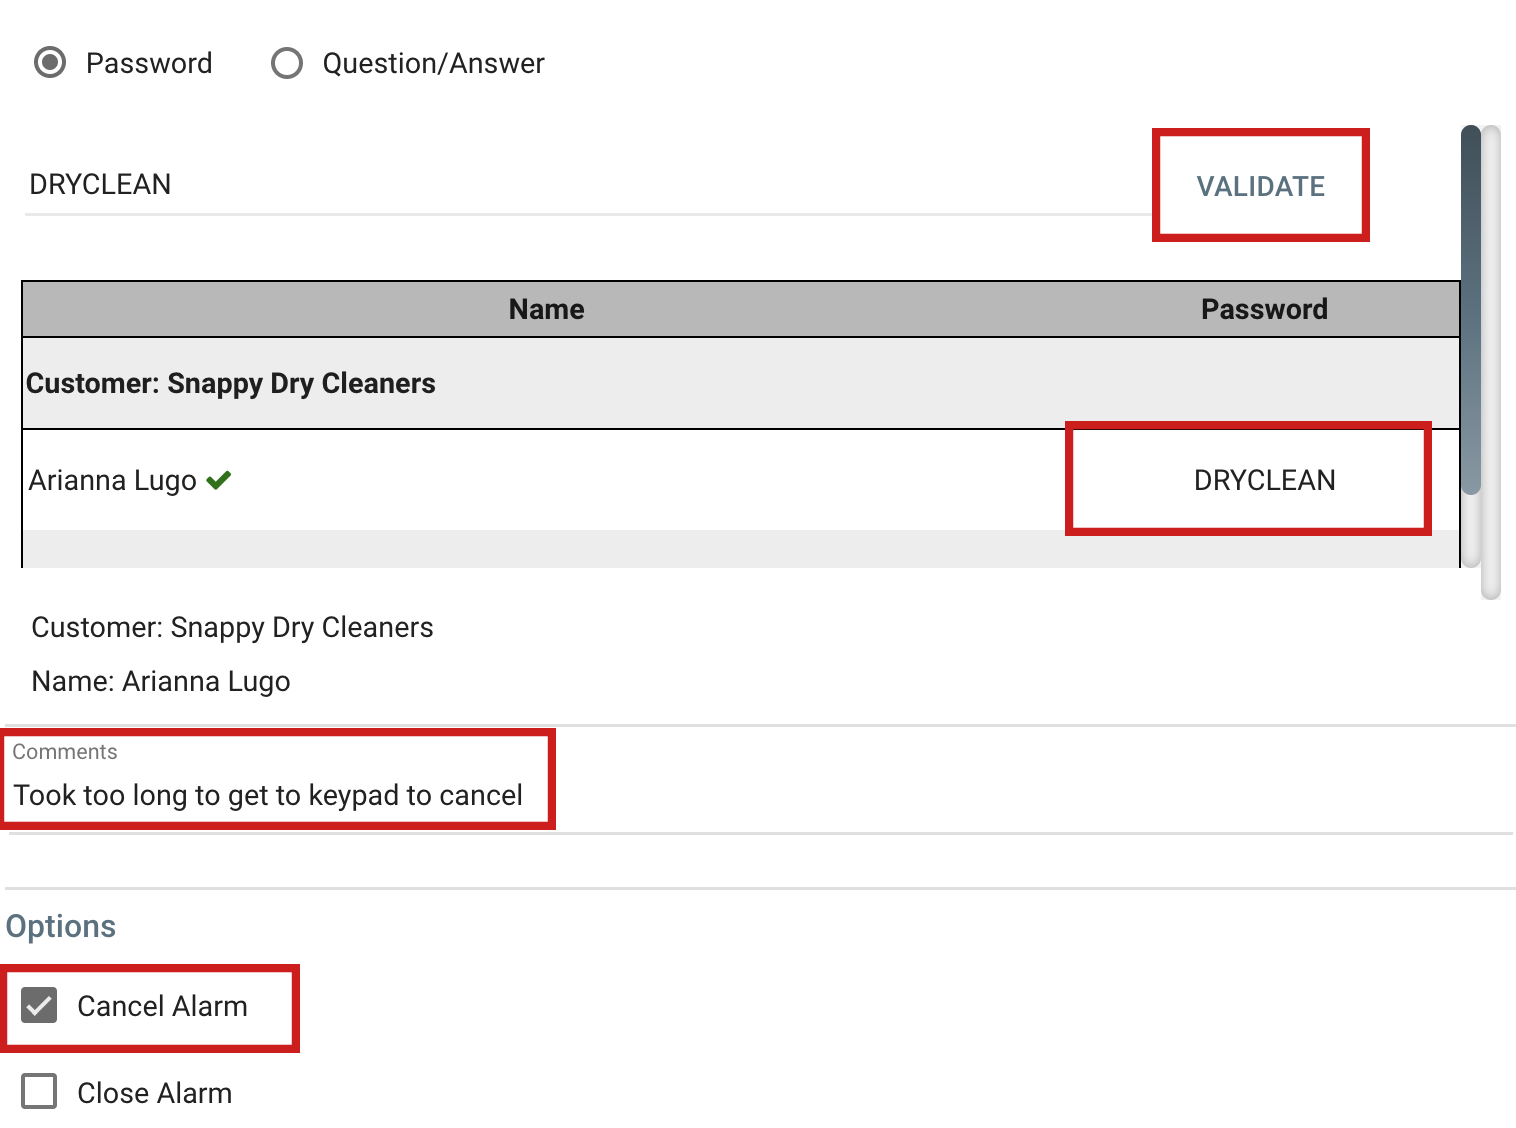 Left side of screen, Password has been clicked, Validate button has been clicked, Comments Typed, Checkbox to Cancel Alarm
Once you have typed in what the customer told you, you may proceed by clicking the Done button. This completes the step. You will notice that the line is now marked with a red color in the Action Pattern, which marks it as complete.
Now we have a bit of a conundrum. You have confirmed with the customer that they simply took too long getting to the keypad, but we have already dispatched the fire department. We need to call the fire department back to notify them that a cancellation has been received from the customer. If you try double-clicking on the command to call the fire department, you will see that the dialer window doesn't appear on the left side. Double clicking something that is already red will not bring the dialer window, because Manitou assumes a double click on a red item to be calling thatentity back.
If you need to call the Fire Department back, even though they are marked red in the action pattern, there is a way. Click one time, which will put the marker icon next to the police item.
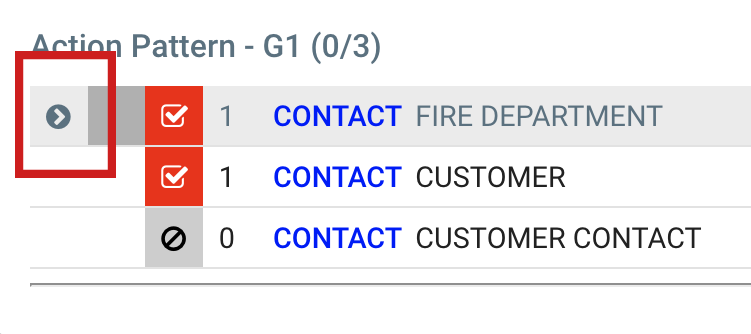 Click ONE TIME on Contact Fire Department line
Once you have put the marker icon next to the appropriate contact, you may click on the Action Menu (wrench icon), then the Action command. This will re-action the command (rather than assuming a call in). You can also use the keyboard shortcut of A-A (press A, then release it and press it again) to speed up the Action Menu > Action Command process.
Once you are back on the Authority Contact screen, the ID/Name and Incident number (if filled previously) will still be present. Since this is a different call, though, there is less of a chance that an operator may speak to a different dispatcher. For this reason, you can erase the value from the previous dispatcher, and put the name of the new one.
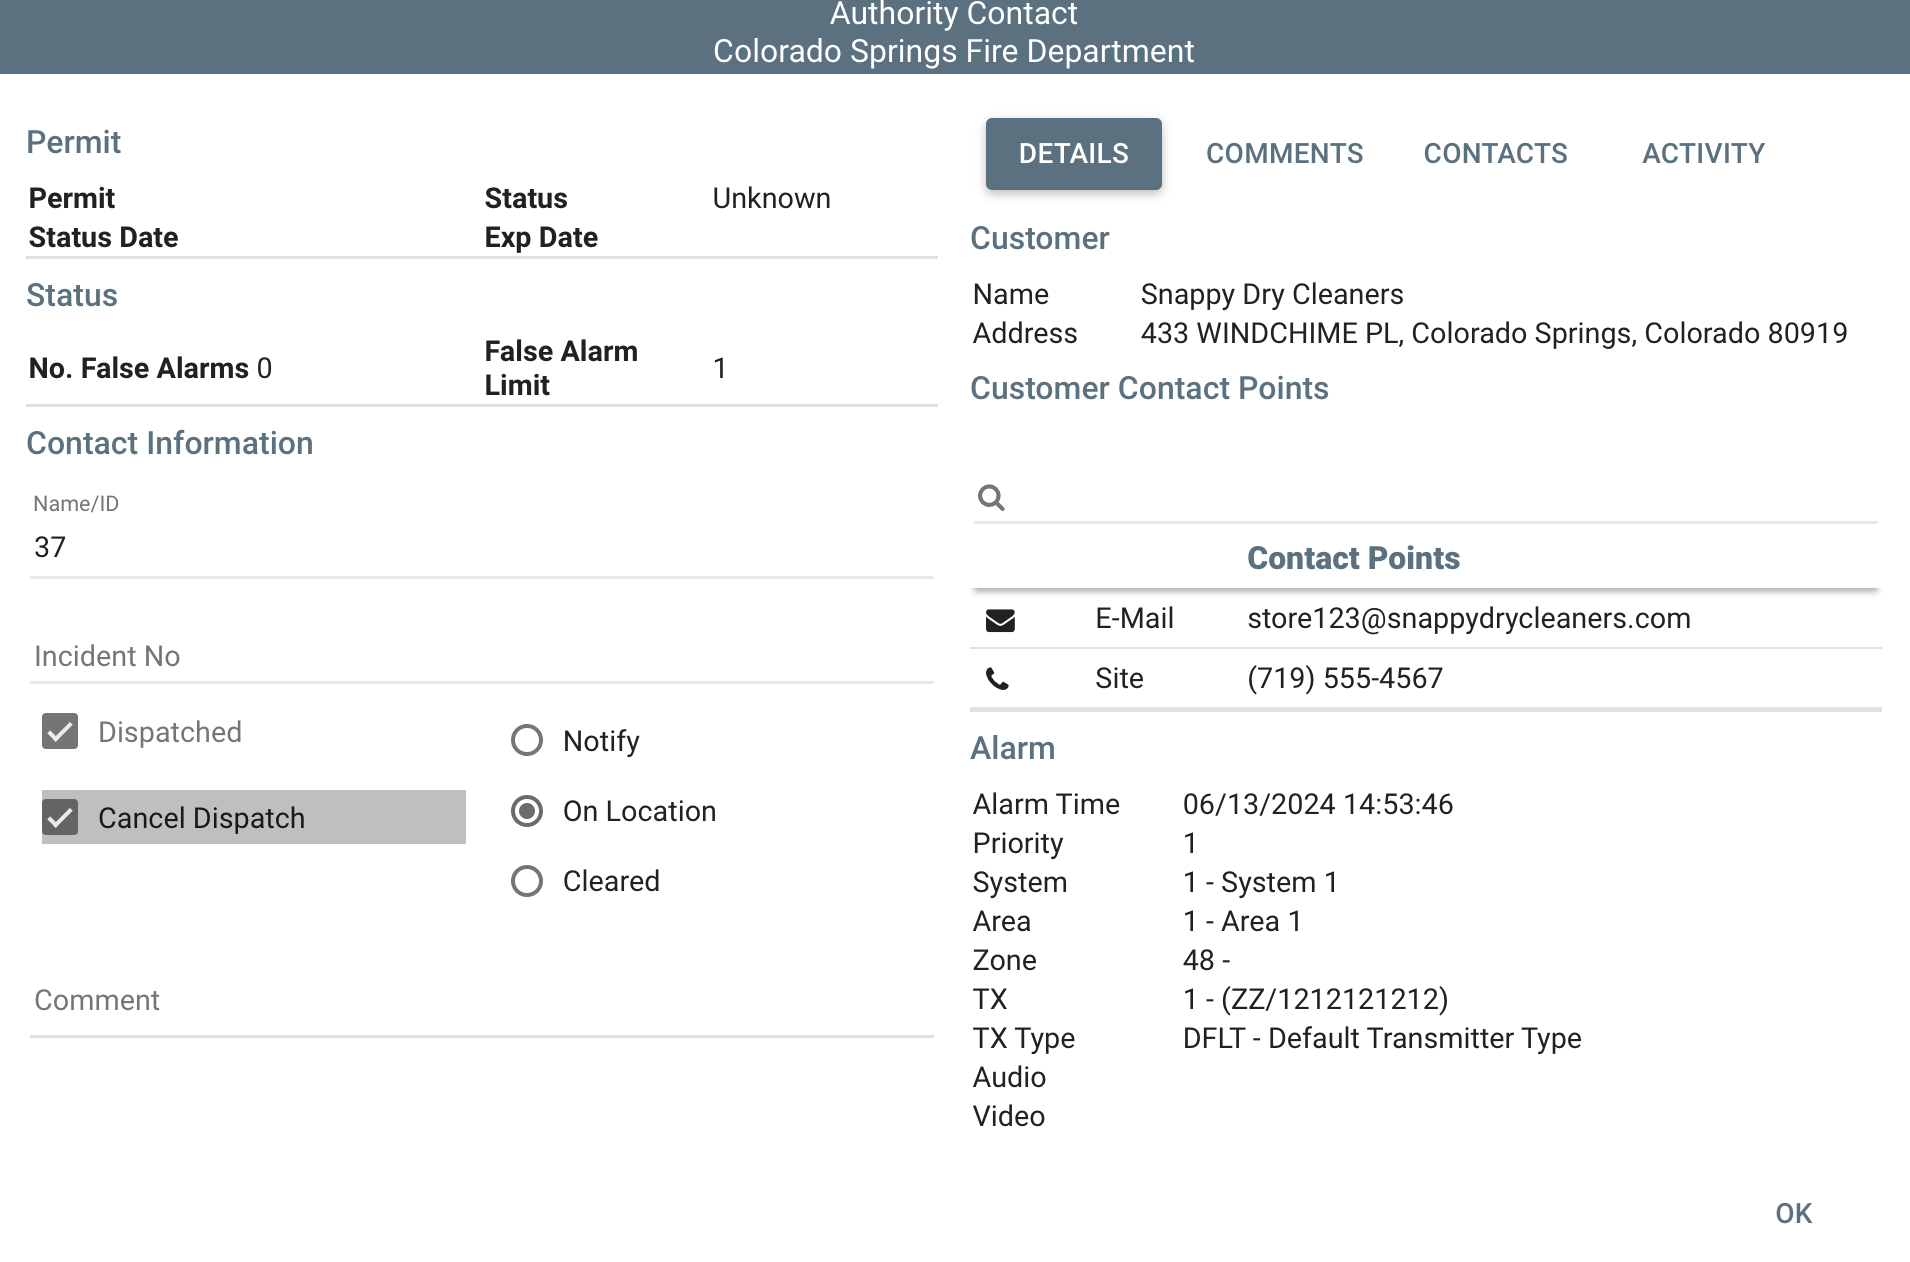 Second visit to Authority Contact screen, showing a different ID Number (we spoke to a different dispatcher at the Fire Department) and Cancel Dispatch box is marked
Depending on your procedures (unique to your Monitoring Center), you may need to Suspend the alarm if there are more steps that need to be followed.
With the recent re-contact of the Police, this particular alarm has no more steps, and it may be closed.
To Close an alarm, click the Finish Icon in the top right. Select the option to Close the alarm.
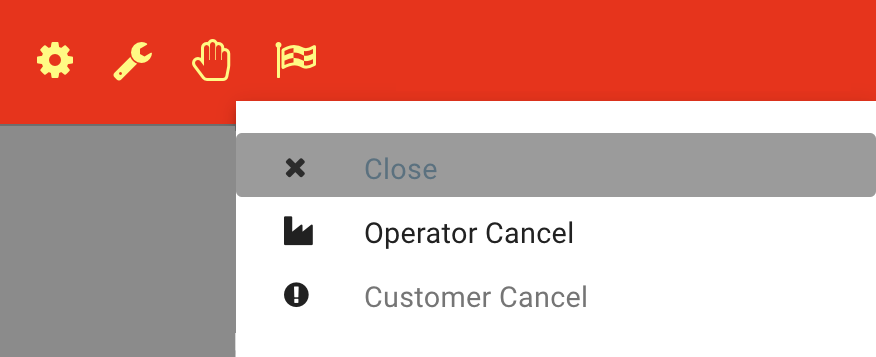 Finish Menu > Close
Depending on the policies for your Monitoring Center, you may or may not be required to complete all Action Pattern items before closing the alarm. If there is a compelling reason to close the alarm before all of the actions are completed, you may use Operator Cancel, which will force you to type your Manitou password to close the alarm early.