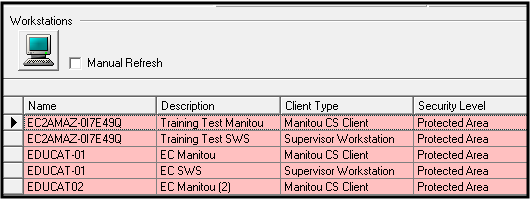
SWS - Forms in the Maintenance Menu - Workstations

The Workstations function is used to define which computers, users, and Monitoring Groups can connect to the Manitou system.

Access Levels are used to define the level of access each Workstation has to the Manitou system. The following table provides an overview of Workstation Access Levels:

Access Level Description
Pending This level is automatically set when a new Workstation is detected requesting access to the Manitou system.
Unapproved The Workstation has been added to the system but has not yet been approved for use and cannot therefore connect to the database.
Non-Protected Area The Workstation can connect to Manitou but may only access non-secure data.
Protected Area The Workstation has, potentially, complete access to the Manitou database.
Disabled Access to Manitou is temporarily blocked, but not yet removed.

Before utilizing the Workstation function, the Workstation must first be physically connected to the Manitou network. 

A user must also have the Manitou client installed on his Workstation. Once these items are complete, users can add a Workstation.

Adding a New Workstation

Perform the following steps to add a new Workstation to Manitou:

  1. Navigate to the Maintenance menu, and then click "Workstations".

Result: The Workstations form displays as shown in the following screenshot:

A screenshot of a computerDescription automatically generated

  1. Click "Edit".
  2. Select the Workstation you want to add by clicking its row to the left of the "Name" column.

Note: Workstations that have not yet been added display green.

Result: The row containing the Workstation you selected displays highlighted as shown in the following screenshot:

A screenshot of a computerDescription automatically generated

  1. Click in the row of the Workstation you want to add at the far right of the "Security Level" column.

Result: A dropdown menu displays as shown in the following screenshot:

A computer screen with a blue and white boxDescription automatically generated

  1. Select the "Protected Area" row and click "Save".
  2. If you want to assign the Workstation to a physical Workstation Group, select the appropriate group using the pick list in the "WS Grp" field.
  3. If you want to assign the Workstation to a Monitoring Group, select the appropriate group using the pick list in the "Mon. Grp" field.
  4. Click "Save”.

Result: The newly added Workstation is now capable of connecting to the Manitou database. 

Disabling a Workstation

Perform the following steps to disable a Workstation that has already been added to Manitou:

  1. Navigate to the Maintenance menu, and then click "Workstations".

Result: The Workstations form displays as shown in the following screenshot:

A screenshot of a computerDescription automatically generated

  1. Click "Edit".
  2. Select the Workstation you want to disable by clicking its row to the left of the "Name" column.

Result: The row containing the Workstation you selected displays highlighted as shown in the following screenshot:

A screenshot of a computerDescription automatically generated

  1. Click in the row of the Workstation you want to add at the far right of the "Security Level" column.

Result: A dropdown menu displays as shown in the following screenshot:

A screenshot of a computerDescription automatically generated

  1. Select "Disabled".
  2. Click "Save".

Result: The workstation you selected to disable now displays as such in the "Security Level:" column.